Sweet Potato and Black Bean Freezer Burritos

Back when I was brainstorming freezer meals for maternity leave, I wanted to figure out a burrito that would pack loads of veggies, protein, and nutrients, and still be something that I craved when I was exhausted and starving. I achieved that here, and I’d like to thank a giant pile of queso fresco for the assist. Queso fresco is so darn good, fresh, and salty. I purposely only called for 8 ounces in this recipe when the standard block at my grocery store is 10 ounces, so that I could have 2 ounces leftover to nosh on. This filling is sooo flavorful, it has the perfect balance of smoky, salty, sweet, spicy, fresh, and bright… you could eat it with a spoon. And of course it’s only made better when swaddled up in a soft nutty whole wheat tortilla. Homemade tortillas will make these truly bonkers, but of course store-bought will work too. 


Sweet Potato and Black Bean Freezer Burritos

makes 8

Ingredients

1 lb sweet potatoes, chopped into 1/2” cubes

3 tb olive oil, divided

Kosher salt

1/2 yellow onion, finely chopped

1 jalapeño, seeded and finely chopped

2 cloves garlic, minced

1 tb tomato paste

1 tb chili powder

1/2 tsp dried oregano

1 (14 oz) can black beans, drained and rinsed

1 (14.5 oz) can chopped tomatoes

2 c (3 oz) fresh spinach

8 oz queso fresco, crumbled

A handful of chopped fresh cilantro

Black pepper

Hot sauce, to taste

Juice of 1/2 lime


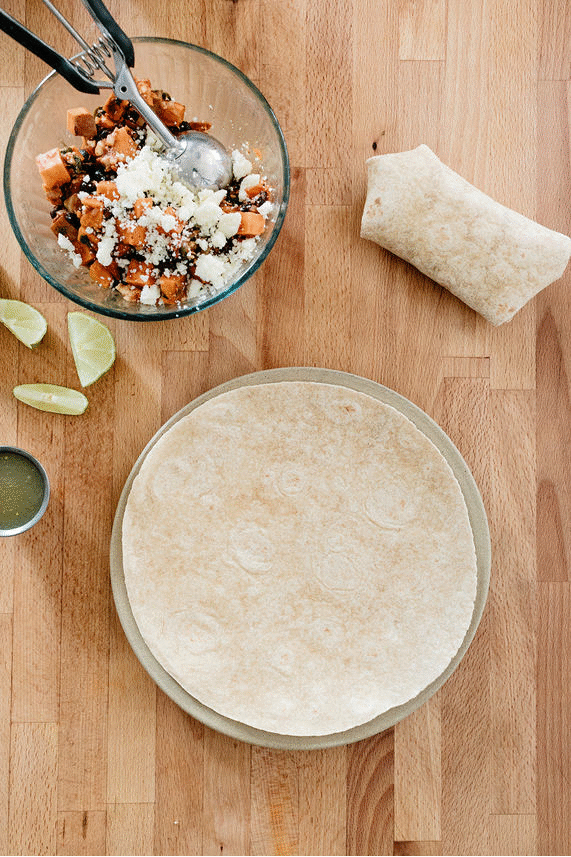
8 10” whole wheat burritos (store-bought or homemade, using a double batch of this recipe and subbing half the flour for whole wheat flour)

Clues

Preheat the oven to 425ºf. Toss the sweet potatoes in 1 tablespoon olive oil and spread out on a sheet pan. Season with a couple of good pinches of salt and roast for 20 minutes, tossing halfway through. You’ll want them to still have a bit of a bite because when you reheat the burritos, the potatoes will continue to cook. (If you want to eat these now and not freeze them, add another 10 minutes to the baking time, until the potatoes are tender.)

In a large skillet, heat the remaining 2 tablespoons olive oil over medium high heat. Add the onion, jalapeño, and a pinch of salt and cook, stirring, until soft, 5-7 minutes. Add the garlic, tomato paste, chili powder, and oregano and cook for another minute. Add the black beans, tomatoes, and spinach and simmer for about 7-10 minutes, stirring, until the spinach has wilted and most of the liquid has cooked off. Add the sweet potato, queso fresco, cilantro, a few turns of black pepper, hot sauce, and lime juice. Taste and adjust as desired. Remove from heat.

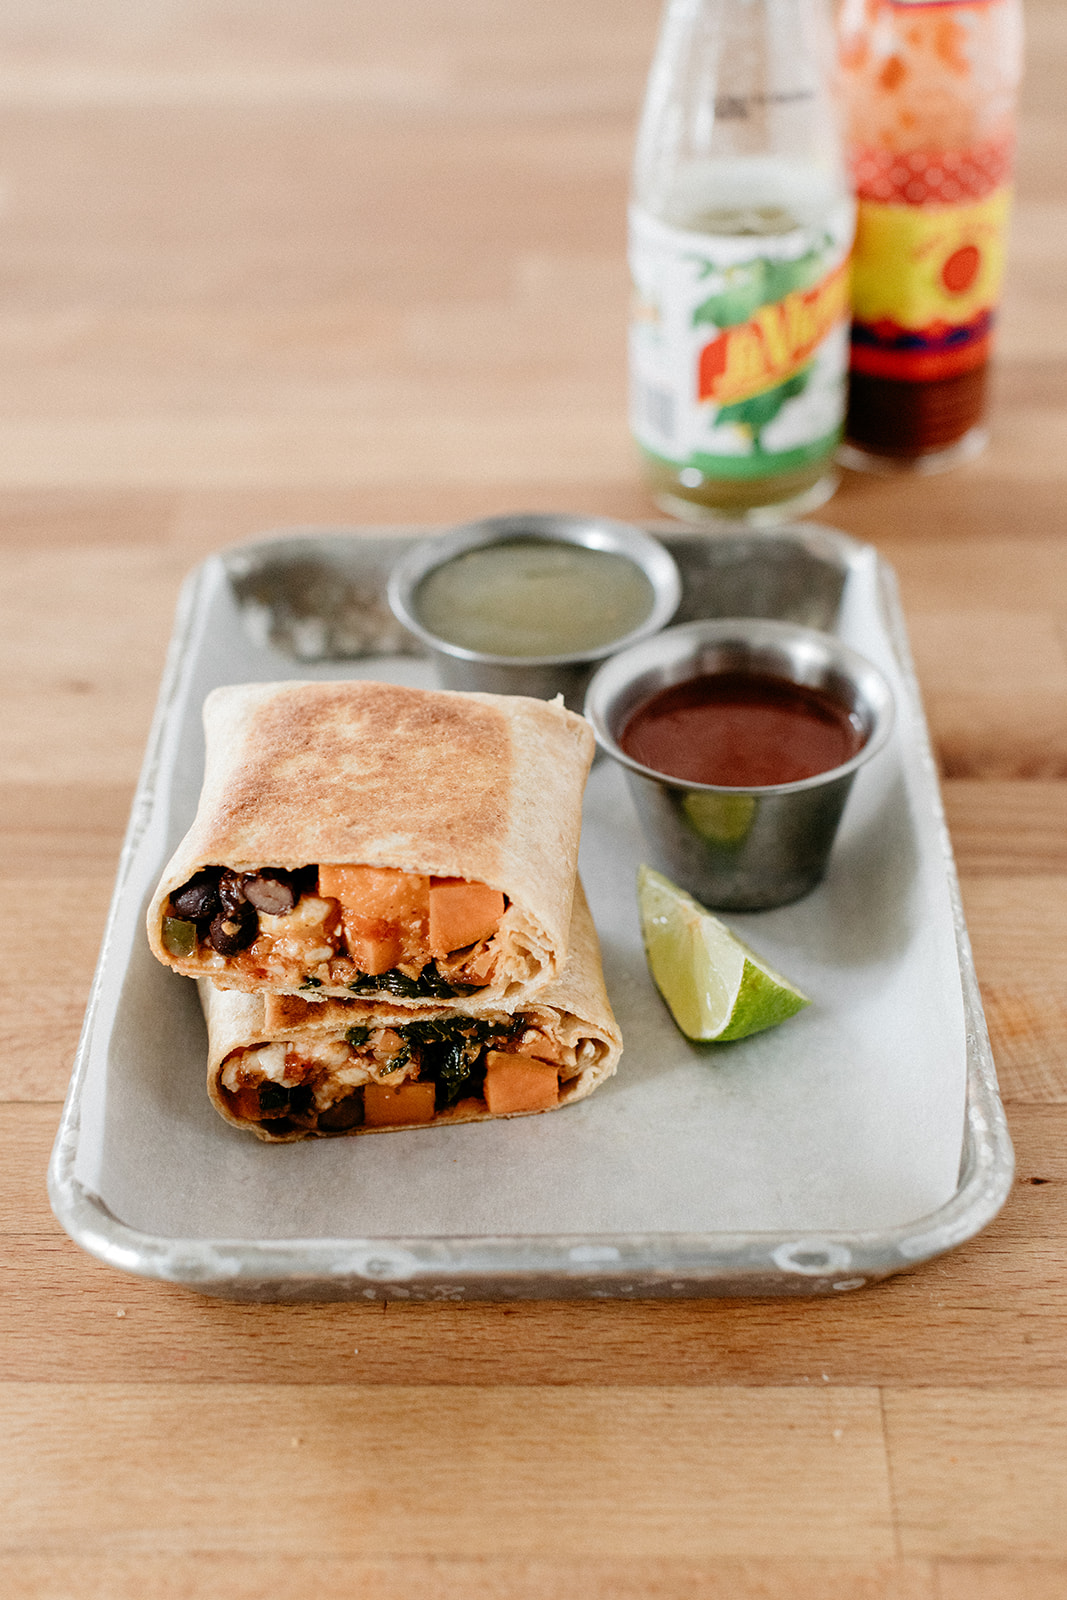
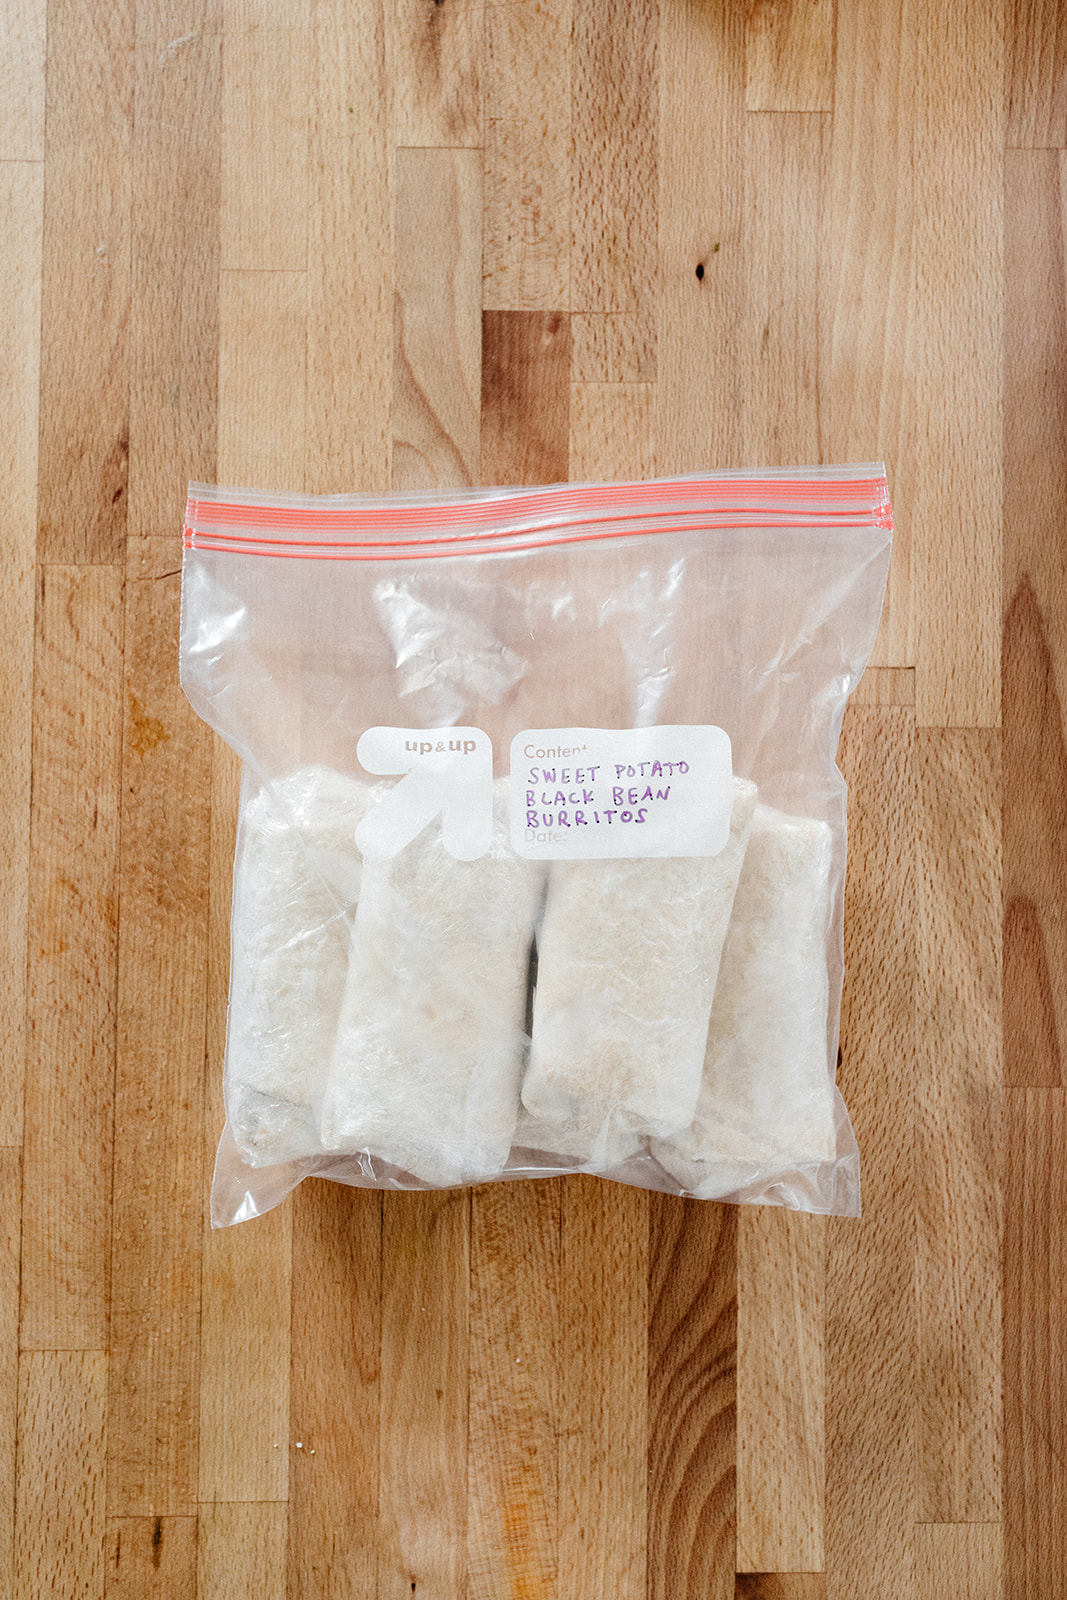
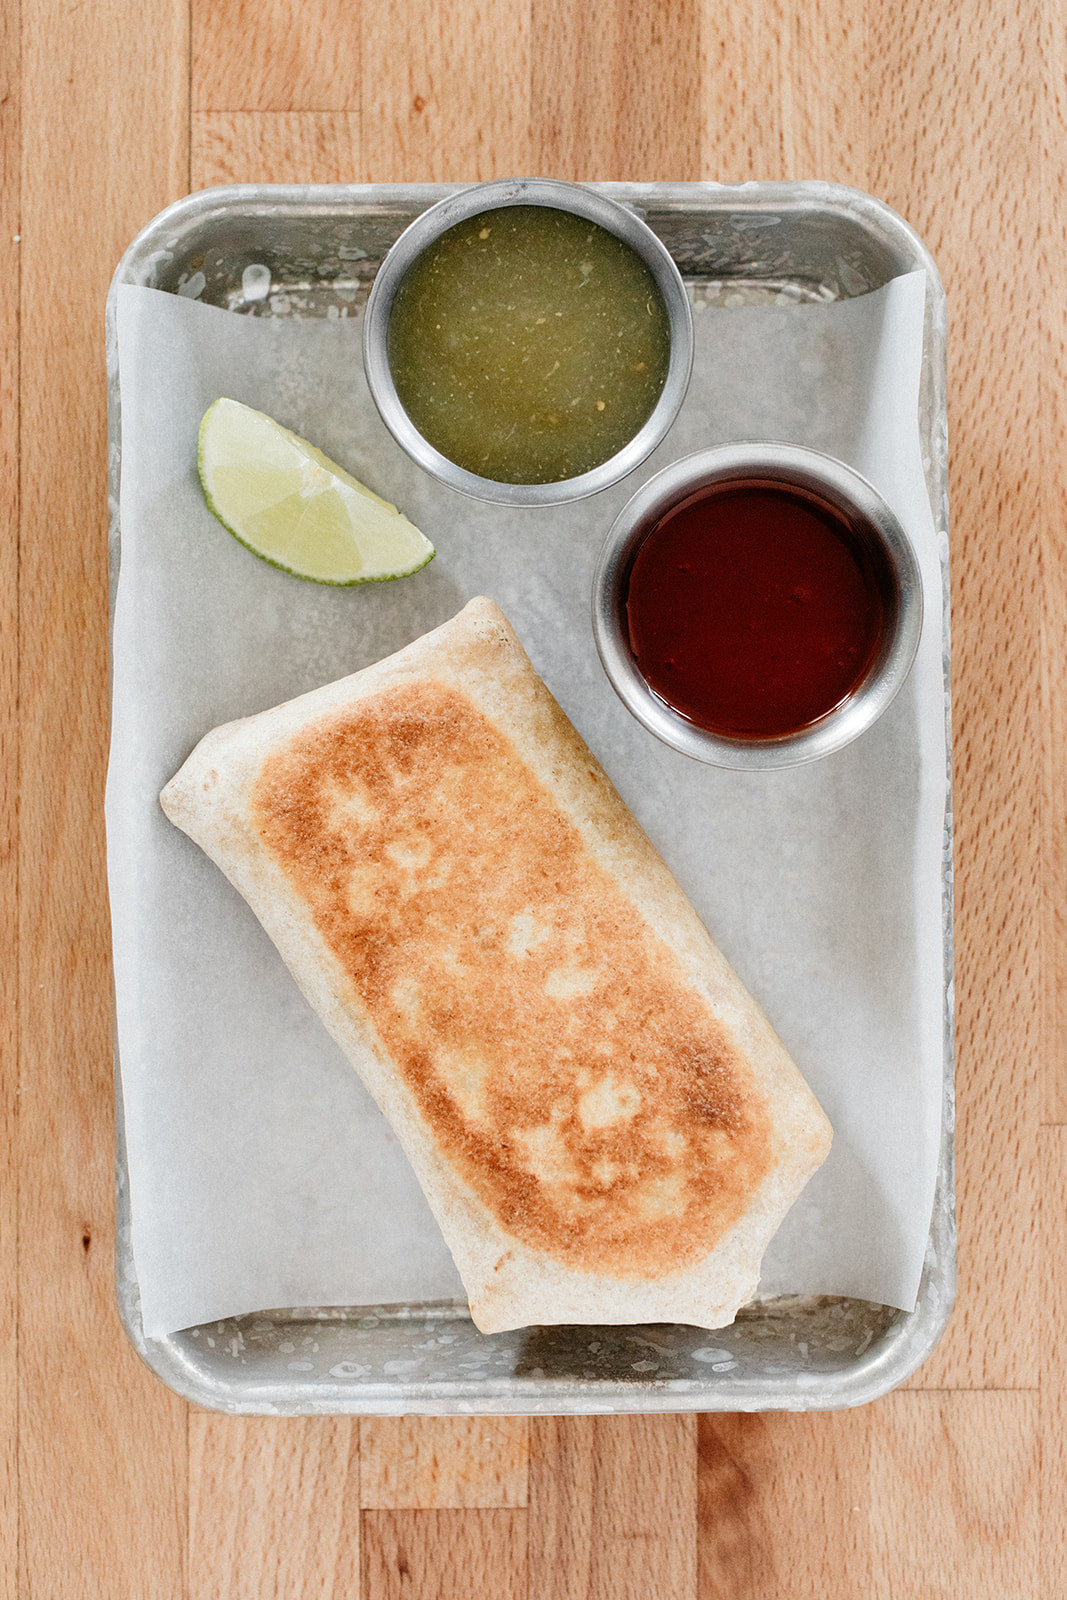
Fill the burritos with about 3/4 cup filling per tortilla. Wrap with plastic wrap, label, and freeze for up to 3 months. To reheat, remove plastic wrap and wrap in a paper towel or parchment. Microwave for 2 1/2-3 minutes, flipping once, until heated through. Let cool slightly and enjoy!

If you want to bring these to the next level, heat a skillet with a thin layer of oil and grill the burritos on each side until browned and crisp.


-yeh!

photos by chantell and brett quernemoen

egg and chive potstickers

After making a bunch of Adam and Ryan’s potstickers for meal prep, I got on a potsticker kick and wanted to make more! Even though my very puffy pregnant hands made pleating a little bit difficult, I spent two extremely pleasant afternoons sitting at the kitchen table, folding dumplings while ice skating was on (this was back in February during the Four Continents competition). It also made me feel like I was in the dumpling scene in Crazy Rich Asians. For this second round of dumplings, I wanted a super low maintenance filling that would also pack some protein, so I went with a classic- egg and chive! The soft fluffy filling could not be easier and it’s so easy to adjust if you want a little more ginger or heat or whatevs. I also like that since it’s totally cooked before going into the dumplings, it makes for a kid-friendly project where you don’t have to worry raw meat getting everywhere. So, Bernie, when you’re ready, say the word and we’ll get pleating!!!


Egg and Chive Potstickers

Makes 38-40 dumplings

Ingredients

8 large eggs

1 tb soy sauce, plus more for serving

1 tb rice vinegar, plus more for serving

1 tb unsalted butter

1 tb sesame oil

1 tsp fresh ginger, minced or grated

1 c (1 1/2 oz) chives, finely chopped

Black pepper

Sriracha or crushed red pepper

All purpose flour, for dusting

40 store-bought dumpling wrappers

Flavorless oil (if frying)

Clues

In a large bowl, whisk together the eggs, soy sauce, and rice vinegar and set aside. In a large skillet, heat the butter and sesame oil over medium high heat. Add the ginger and cook for about a minute, until fragrant. Add the eggs and cook, stirring gentled with a rubber spatula until just set (don’t over cook, otherwise the filling will be dry). Transfer to a large bowl (I use the same bowl that I whisked the eggs in) and break up the egg into small pieces with your spatula. Stir in the chives, a few good turns of black pepper, and sriracha or crushed red pepper to taste. Taste and adjust as desired.

Line a sheet pan with parchment paper and dust with flour. Fill the dumpling wrappers by moistening the edges with water, adding a heaping teaspoon of filling, and pleating the edges, pinching well to seal. (I do this step seated at my kitchen table since it takes kind of a while. I’d also recommend YouTubing pleating videos, way easier to see it than to describe it!) Place the dumplings on the sheet pan. 

If cooking immediately, you can either steam or fry them. To steam, cut out a round of parchment paper to fit in the bottom of your steamer and cut a bunch of holes in it. Place the dumplings in the steamer leaving a little bit of room between them and set the steamer over a pot of boiling water. Steam for about 10 minutes, or until cooked through. Let cool slightly and serve. I like dipping mine in a half-and-half mixture of soy sauce and vinegar. Maybe a drizzle of sesame oil.

To fry, heat a thin layer of flavorless oil in a large lidded nonstick skillet. Place the potstickers flat-side down in the skillet in a single layer and cook until browned on the bottom, 2 to 4 minutes. Add 1/4 cup of water and immediately cover the pan, since it will be very spitty. Cook for 3 minutes, then remove the lid and continue to cook until all of the water evaporates. Let cool slightly and serve. I like dipping mine in a half-and-half mixture of soy sauce and vinegar. Maybe a drizzle of sesame oil.

To freeze, stick the sheet pan into the freezer and freezer for a few hours until the dumplings are firm. Transfer to a ziploc bag and stick back in the freezer for up to 3 months. Heat them either by steaming or frying (adding an extra few minutes for each method), or using one of the methods here.


-yeh!

photos by chantell and brett quernemoen

Chocolate Peanut Butter Oatmeal Muffins

One of the number one things that I was told to prep before Bernie’s arrival was oatmeal muffins! Oatmeal to help with lactation and muffins because they’re quick and easy to thaw from frozen and you can eat them with one hand. I do love oatmeal in the morning, and I usually have it with peanut butter or almond butter, cinnamon, berries, a little dark chocolate, and Trader Joe’s crunchy super seed mix for some Omega-3s, so I made a muffin version of this! They’re super good and filling, they’ve got pockets of melty chocolate, and they’re topped with just a few sprinkles that I thought would add a little humor to times that were destined to be insane, filled with Bernie wails, and true muffin emergencies. This is a pretty versatile recipe— you can add different spices, use butter or coconut oil, and change up the nut butters and mix-ins (don’t skimp on the chocolate though!). I would definitely recommend topping them with something, whether it’s sprinkles or turbinado sugar and/or seed mix, the added crunch on top is the loveliest.

Side note: I can’t really eat these muffins without thinking about the Bojack muffin episode when Neal McBeal the Navy Seal calls dibs on muffins at the store and Bojack eats them all. I wonder how Bojack is doing these days. I’m afraid to watch it with Bernie in ear shot and all. 


Chocolate Peanut Butter Oatmeal Muffins

Makes 8 Jumbo Muffins

Ingredients

1 1/2 c (120g) rolled oats

1 c (240g) milk (2%, whole, or almond)

1/2 c (65g) all-purpose flour

1/2 c (65g) whole wheat flour or more all-purpose flour

2 tsp baking powder

1 tsp cinnamon 

1/2 tsp kosher salt

1/2 c (113g) unsalted butter or coconut oil, melted and slightly cooled

1/2 c (128g) creamy unsweetened peanut butter (almond butter works too!)

2 tsp vanilla extract

2 large eggs

1/2 c (150g) maple syrup

3/4 c (90g) dried cherries, blueberries, or raisins

3/4 c (4 oz) chopped dark chocolate

3/4 c (45g) unsweetened coconut flakes

Super seed mix, optional, for topping

Coarse sanding sugar or sprinkles, for topping

Clues

Preheat the oven to 400ºf. Line 8 jumbo muffin tins with liners and set aside.

In a medium bowl, combine the oats and milk and let soak for 20 minutes.

In a separate medium bowl, whisk together the flours, baking powder, cinnamon, and salt.

In a large bowl, whisk together the butter or coconut oil, peanut butter, vanilla, eggs, and maple syrup until smooth. Add the oats and flour mixture and stir to combine and then fold in the dried fruit, chocolate, and coconut. Scoop into muffin tins and sprinkle with seeds, if using, and sanding sugar or sprinkles. Bake until a toothpick inserted into the center comes out clean; begin checking for doneness at 22 minutes. Let cool in the pans for a few minutes and then transfer to a wire rack to cool completely or enjoy warm! 

Cooled muffins can be stored in a ziploc bag in the freezer for up to 3 months. Reheat in the microwave for about a minute.


-yeh!

veggie potstickers with spicy dipping sauce

Adam and Ryan from Husbands That Cook are two of the sweetest humans on the planet and I’m so excited to be sharing this recipe from their new book today! I’ve gotten to hang out with them a few times in LA and every time it’s like an espresso shot of joy. Their book totally captures that happy, joyous energy through a ton of delicious approachable everyday recipes that all happen to be vegetarian. I’ve kept their book on the shelf in my kitchen where I keep my most used cookbooks and it exudes great energy all over. One of the first things that I made from their book were these veggie potstickers and they are so good!!! I was deep in meal prep mode when the book arrived and looking for something kind of snacky and vegetabley that I could keep in the freezer, and these checked both of those boxes. So I made a big batch of them and kept a stash in my freezer for dumpling emergencies. The flavors are great, Adam and Ryan understand my need for a very gingery potsticker, and these can be steamed or pan-fried! I prefer them crispy and pan fried, but pulling out my little bamboo steamer and steaming a cute basket of them is also fun :)!

Anyway, if you don’t yet follow Husbands that Cook or have their book, get on it!!!! Your life will be warmer and more delicious, I promise. 


veggie potstickers with spicy dipping sauce

makes about 40

from Husbands that Cook

ingredients

for potstickers:

4 tb vegetable oil, divided

2 c (200g) finely chopped onion (about 1 medium onion)

3 c (185g) sliced bok choy cabbage (about 2 small cabbages)

2 c (155g) grated carrots (about 2 medium carrots)

1 c (120g) grated daikon radish (about one 6-inch piece)

2/3 c (40g) sliced scallions (about 3 scallions)

4 tsp tamari or soy sauce

2 tb (24g) minced ginger

3 large garlic cloves (15g), minced

40 gyoza wrappers

gyoza dipping sauce, for serving (to follow)


for dipping sauce:

1/4 c (60 ml) rice vinegar

1/4 c (60 ml) tamari or soy sauce

1/2 tsp sesame oil

1/4 tsp red pepper flakes

1/8 tsp garlic powder

1/8 tsp ginger powder

clues

for potstickers: place a large, deep skillet over medium heat, and add 2 tablespoons of vegetable oil. when hot add the onion and cook until softened, about 5 minutes. add the bok choy, carrots, daikon, and scallions, and cook for 4 minutes until softened, stirring occasionally. Add the tamari, ginger, and garlic, and cook for 1 to 2 minutes more. remove from heat and transfer the vegetable mixture to a bowl or plate to cool enough to handle comfortably. use the filling immediately, or transfer to a sealed container in the fridge for up to 3 days.

to make the potstickers, first prepare a work station with the gyoza wrappers, the bowl of filling, a small bowl filled with water to wet your fingers, and a tray lined with parchment for the finished dumplings.

hold one gyoza wrapper flat in the palm of your hand. scoop about 2 heaping teaspoons of filling into the center of the wrapper. fold the wrapper over, pinching and pleating the edges to seal them tightly. place on the prepared tray, and repeat with the remaining wrappers until all the filling is used up, arranging the finished potstickers so they are not touching. they can be cooked immediately, or frozen for future use (freeze them directly on the tray, then transfer to a sealed container in the freezer for up to 2 months).

place a large, deep skillet over medium heat, and add the remaining 2 tablespoons of vegetable oil. when hot, place the potstickers flat-side down in the skillet in a single layer, as many as will fit comfortably without touching. cook without stirring until deeply browned on the bottom, 2 to 4 minutes (add 1 to 2 minutes of cooking time if frozen). without stirring, add 1/4 cup of water and immediately cover the pan, as it will spatter aggressively. cook for 2 to 3 minutes, then remove the lid and continue to cook until all of the water evaporates. serve immediately with dipping sauce and enjoy!

for dipping sauce: in a small bowl or measuring cup, stir together all the ingredients. let sit for 15 minutes before serving to allow the flavors to blend. use immediately or keep in a sealed container in the fridge for up to a week. makes about 1/2 cup.


-yeh!

photos by chantell and brett!