Choose Your Own Adventure Granola Bars

One of the questions I get most these days is how my cooking has changed now that Bernie is around. The answer is that I have a whole new appreciation for quick one-bowl recipes, recipes that require minimal chopping or actual heating, and anything that can sit nicely and well-behaved for 10 minutes if at any point I need to drop it and feed Bern. This is because, unless Bernie is having Grandma or nanny time, she is most likely attached to me. Her bouncer and play pads are cool and stuff but she is often over them after like five minutes so I have to use that time strategically and schedule it for the 10 seconds when I need to put something in the oven or chop up an onion. Or another scenario is that I plan to do all of my vegetable chopping for the next few days while she’s napping so that when she’s awake and on me, I can sail through salad assembly without the use of a knife. 

Logistics aside, cooking has also gotten way more exciting because have you ever seen a baby smell a piece of freshly baked pita for the very first time?! Or stick her face in a pluche of basil for the first time?? The facial expressions are solid gold. I also sometimes try to explain everything I’m doing to her, which kills two birds with one stone: I can rehearse my Girl Meets Farm lines and also encourage her communication development beyond singing Baby Beluga over and over

Some other things I’ve learned include that the sounds of the stand mixer and blender are soothing to her, the site of the water running is fascinating to her, if she’s ever a little fussy I can step outside to get some herbs from the garden and that immediately calms her down, and that she wants to hold anything that has a crunchy wrapper. So if I need to carry a lot of things from the fridge to the counter, I can put the bag of spinach in her hand while I carry the lemon and parmesan, and 50% of the time the spinach will actually make it to the counter!

If this all sounds fine and dandy, trust me, it was a learning curve! Remember the first thing I baked after Bernie was born? Making those cakes required 5,000 breaks, hours and hours, and I still had to forego my obsessive desire for perfect ganache drips. Which is fine. This is still one of my favorite cake photos ever. But slowly I learned this new way of doing things and I’ll continue to learn, especially as Bernie becomes old enough to help in the kitchen (or to decide that she wants nothing to do with helping in the kitchen)!

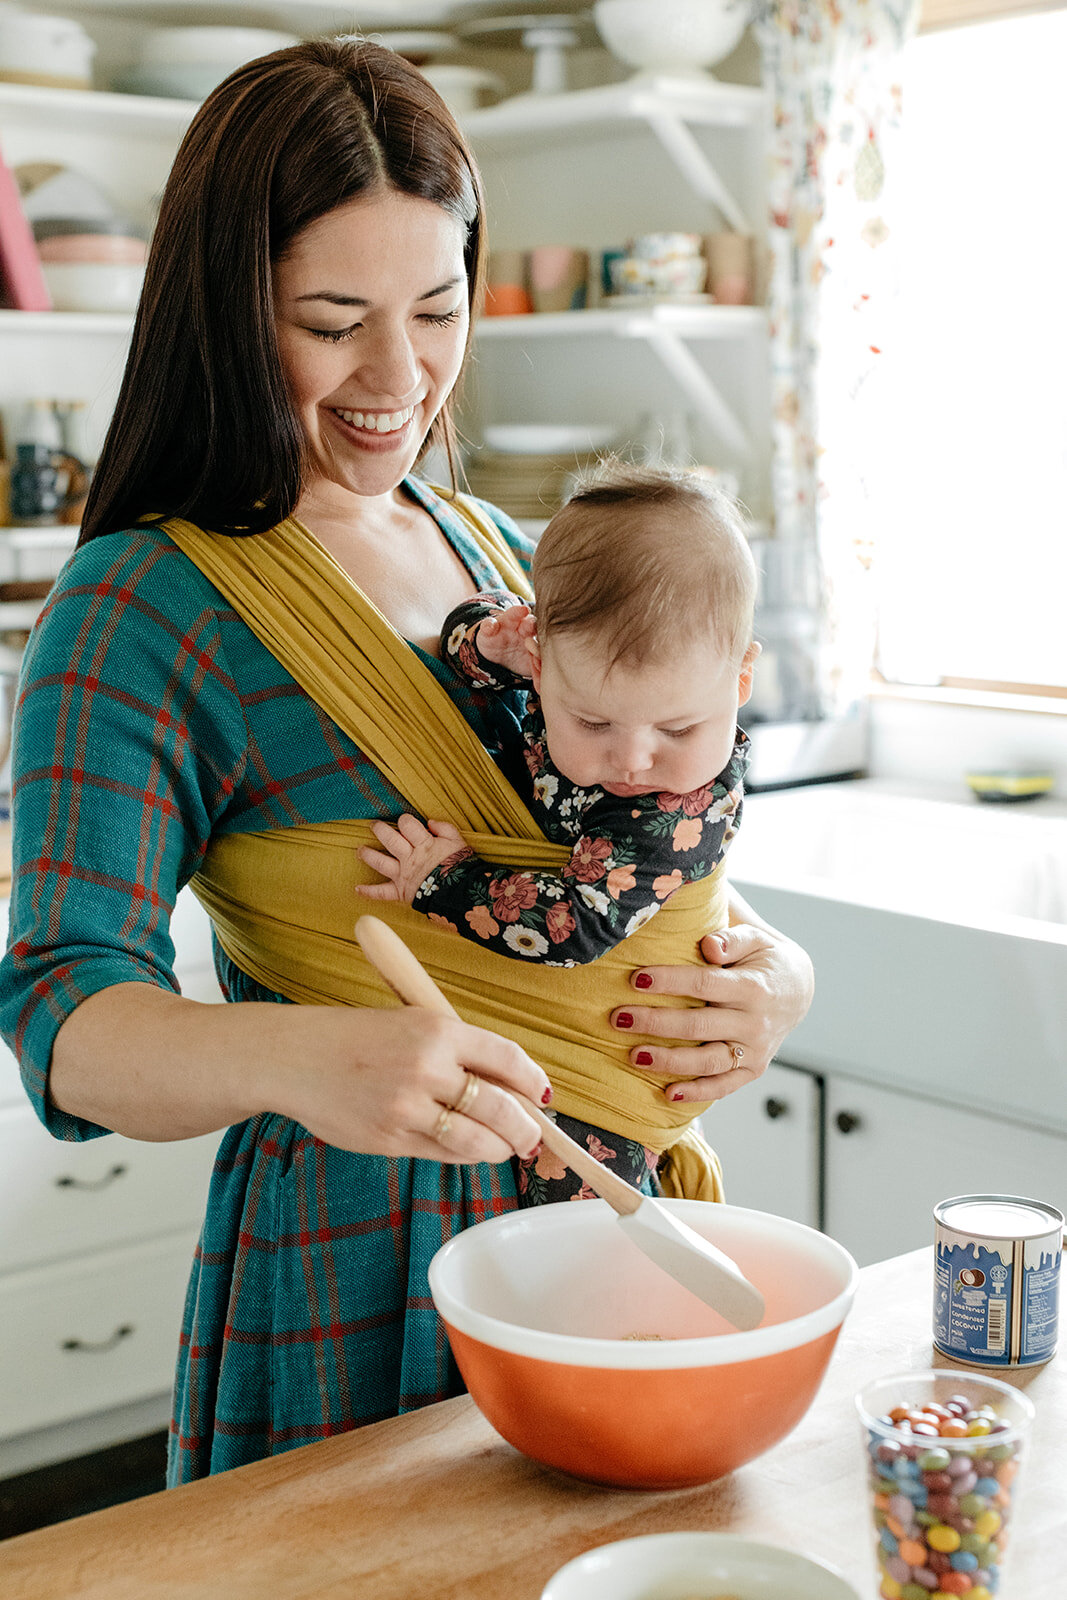
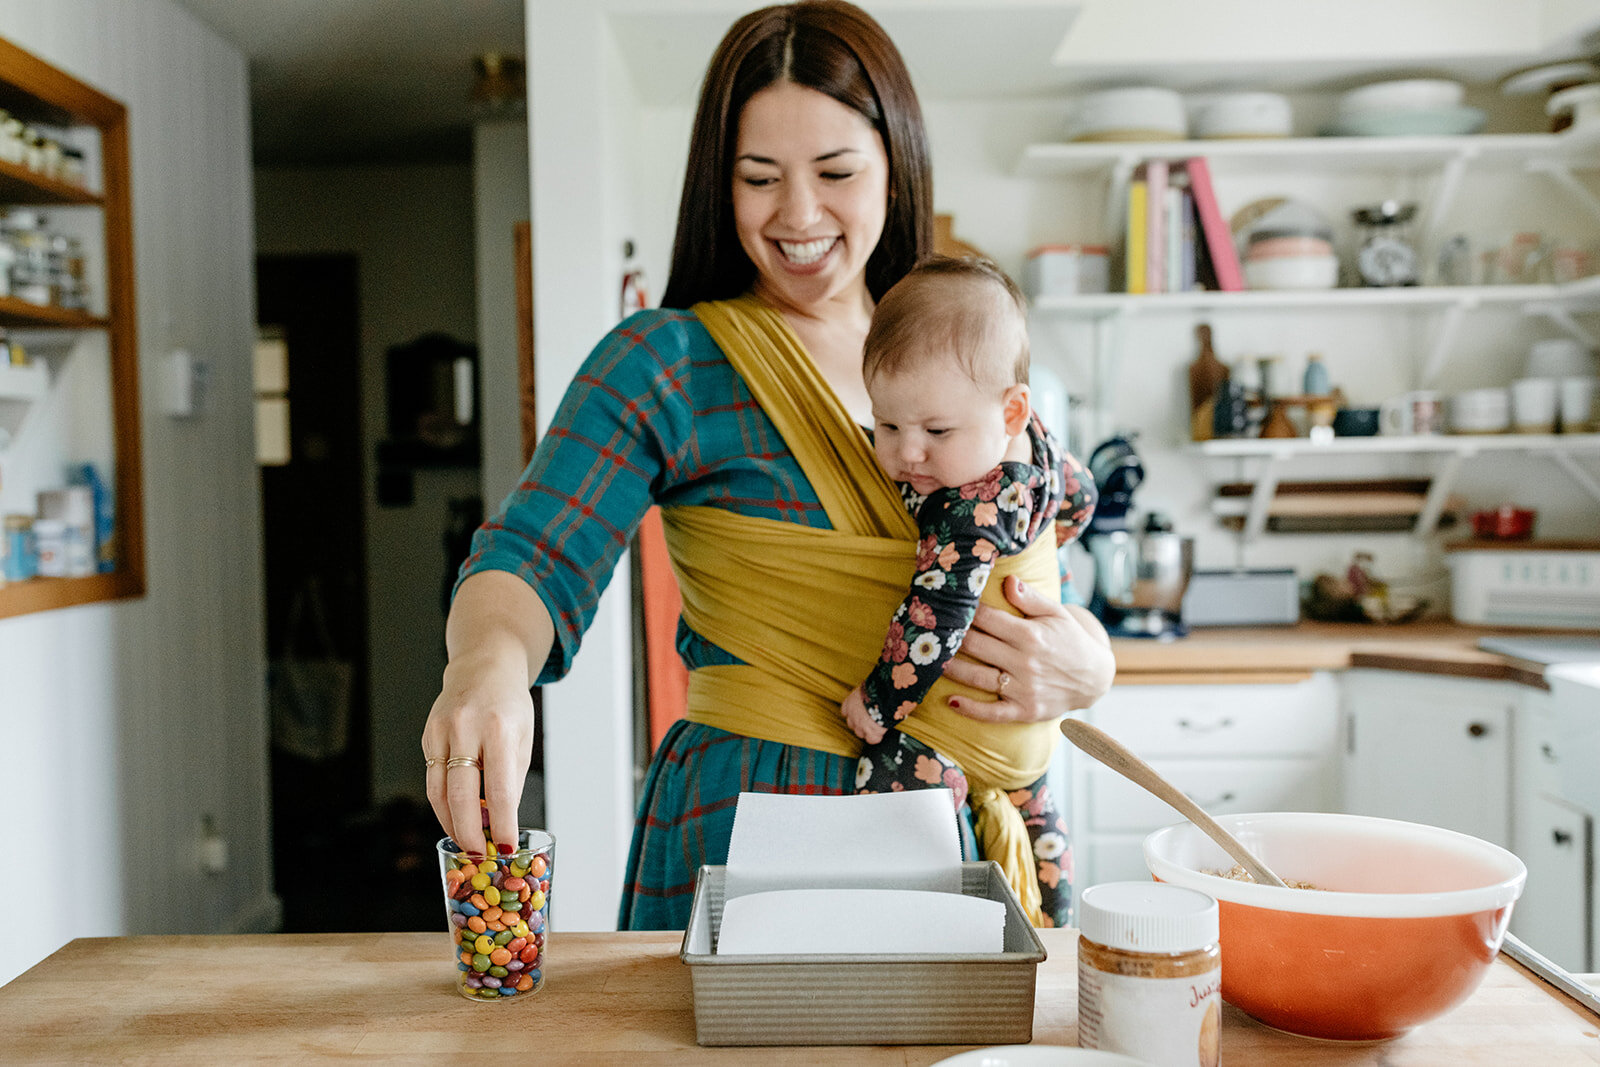
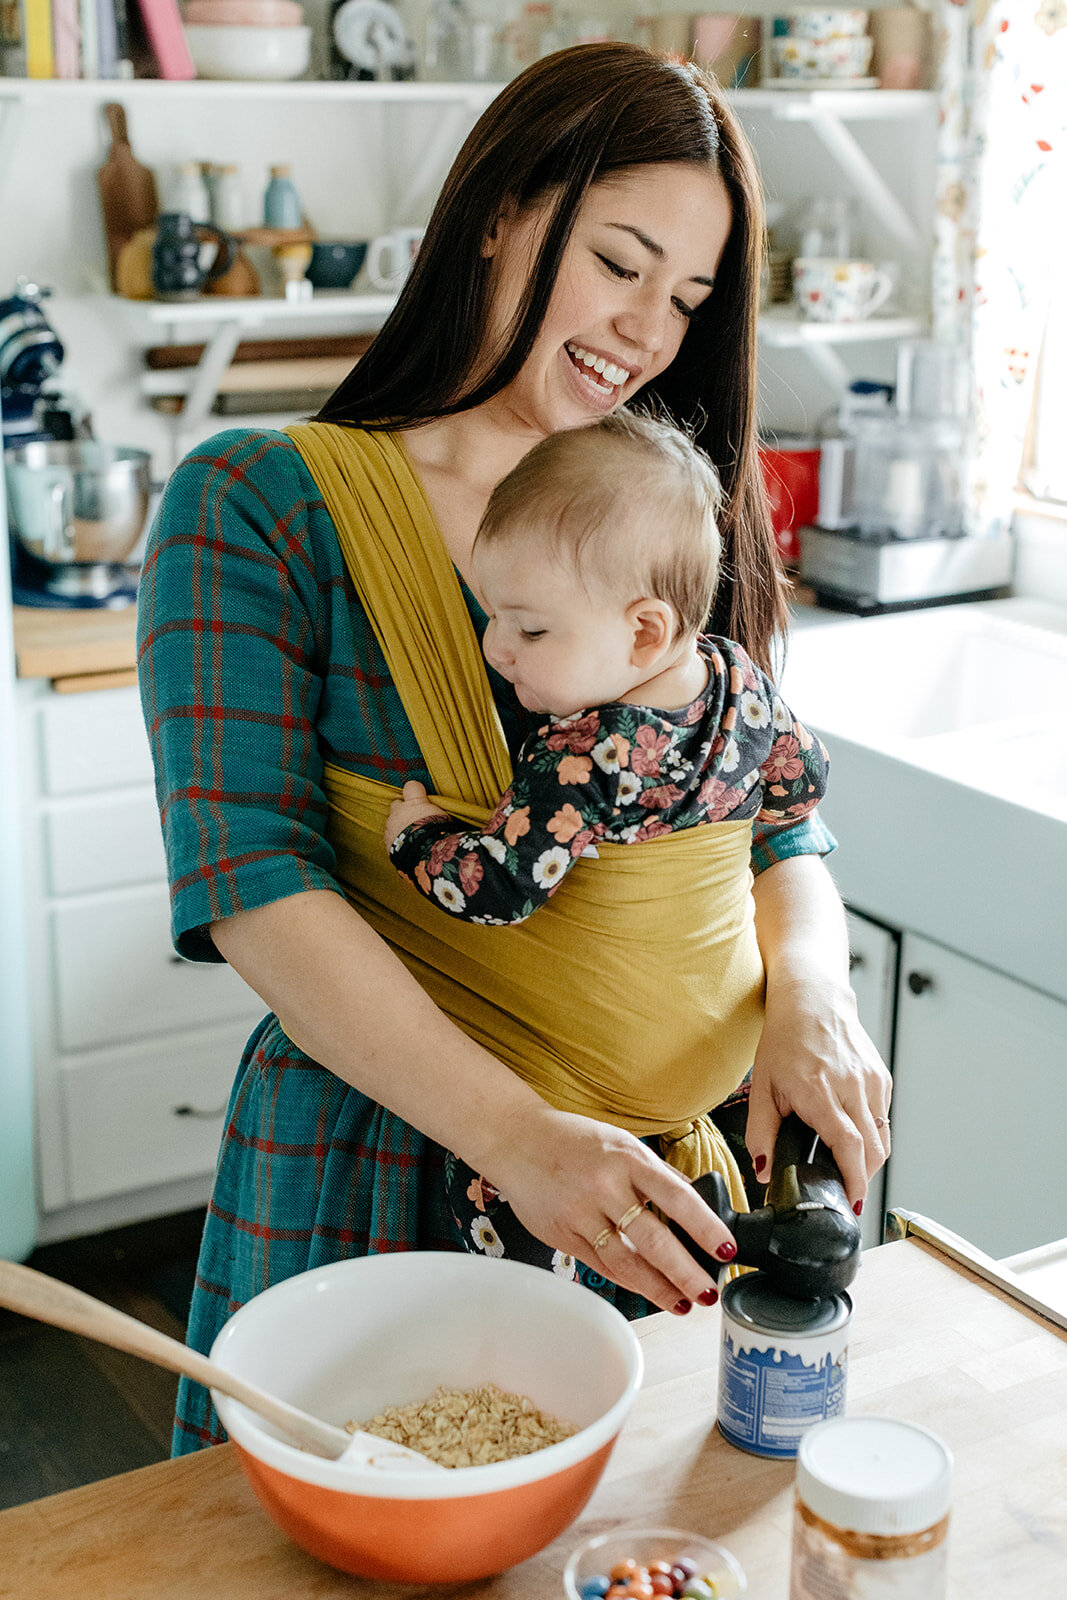
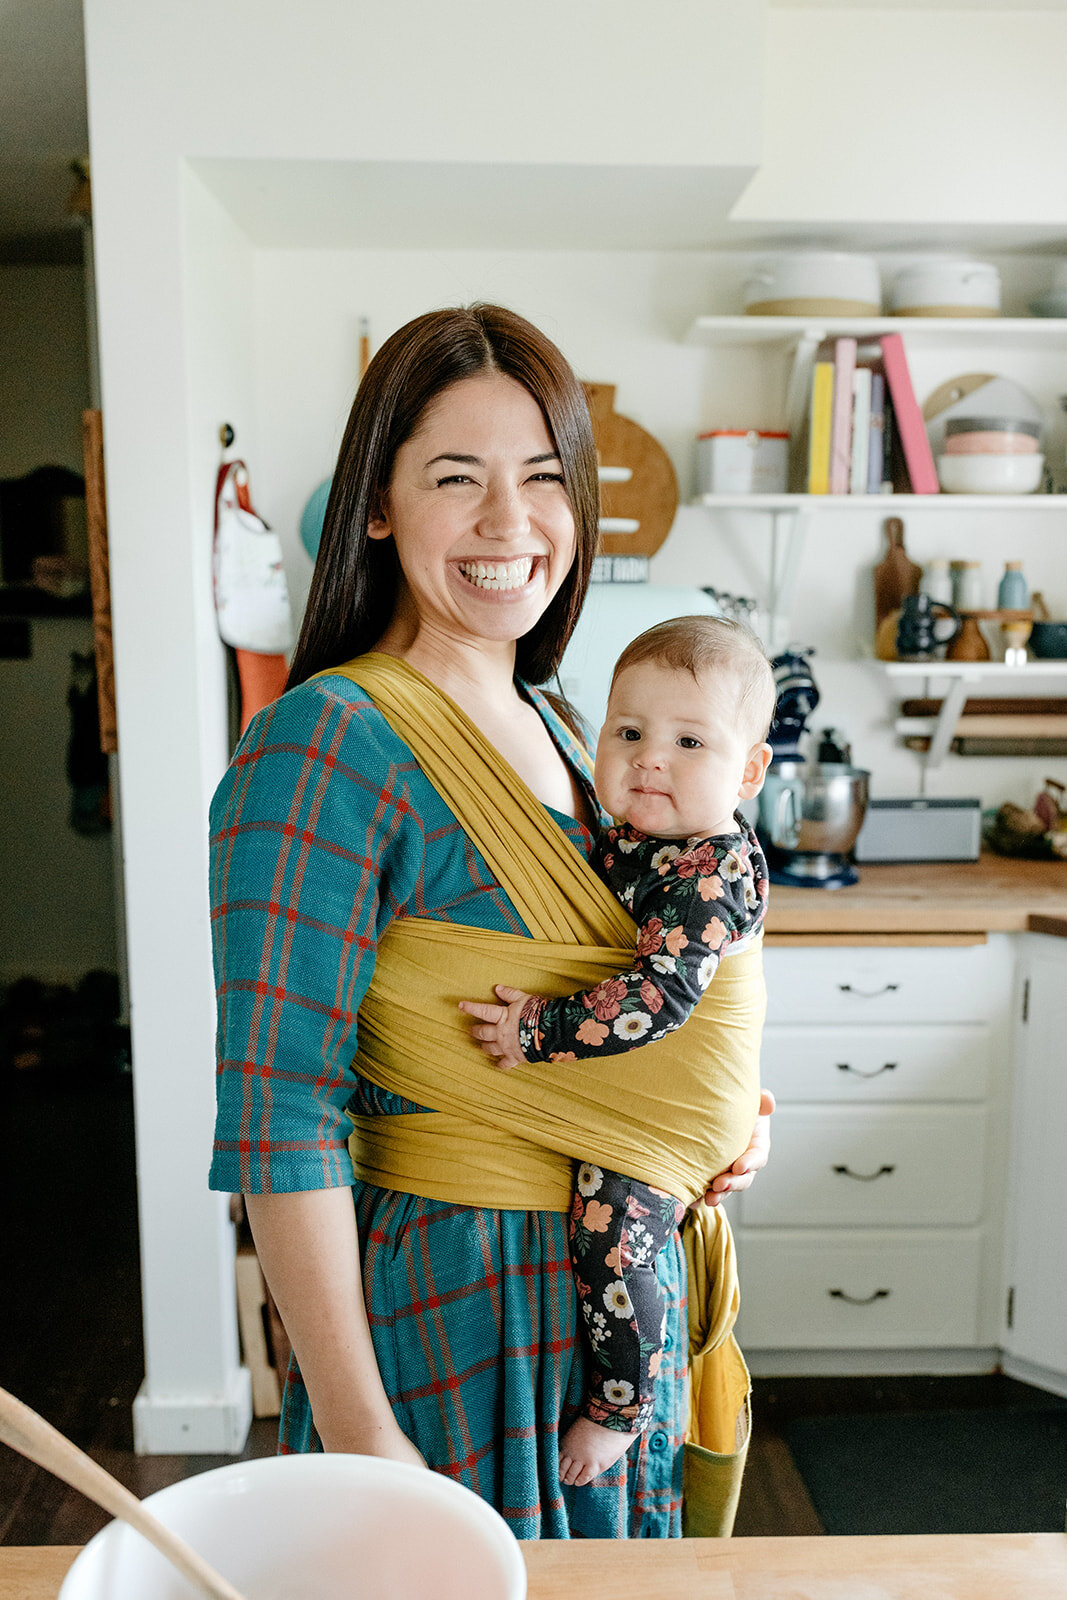
One of my faaaaaaaaaaaaaaaavorite pieces of baby gear during this adjustment to life with Bernie has been my Solly Wrap. I’ve been looking forward to this partnership with them for forever because, well, if you follow me on Instagram you know that she practically lives in it. For her first few months, it was her guaranteed happy place. I wouldn’t leave the house without it because if ever she woke up in her stroller a little cranky, I knew that I could put her in the wrap and calm her right down (even when she wasn’t in it, I’d wear it on me to the grocery store so that I could plop her in it at a moment’s notice). For a while during maternity leave, I would go walking with her at the gym every single day and she would nap the whole time while I listened to Unorthodox. I loved those afternoons sooo much. And then where was she when I made my first postpartum loaf of challah? In her wrap. 

Once we discovered this wrap, time in the kitchen got so much smoother and more enjoyable for both of us! I just love having her on me and she loves it too. I honestly can’t sing enough praises about this thing. It’s become my new go-to gift for new parent fronds. 

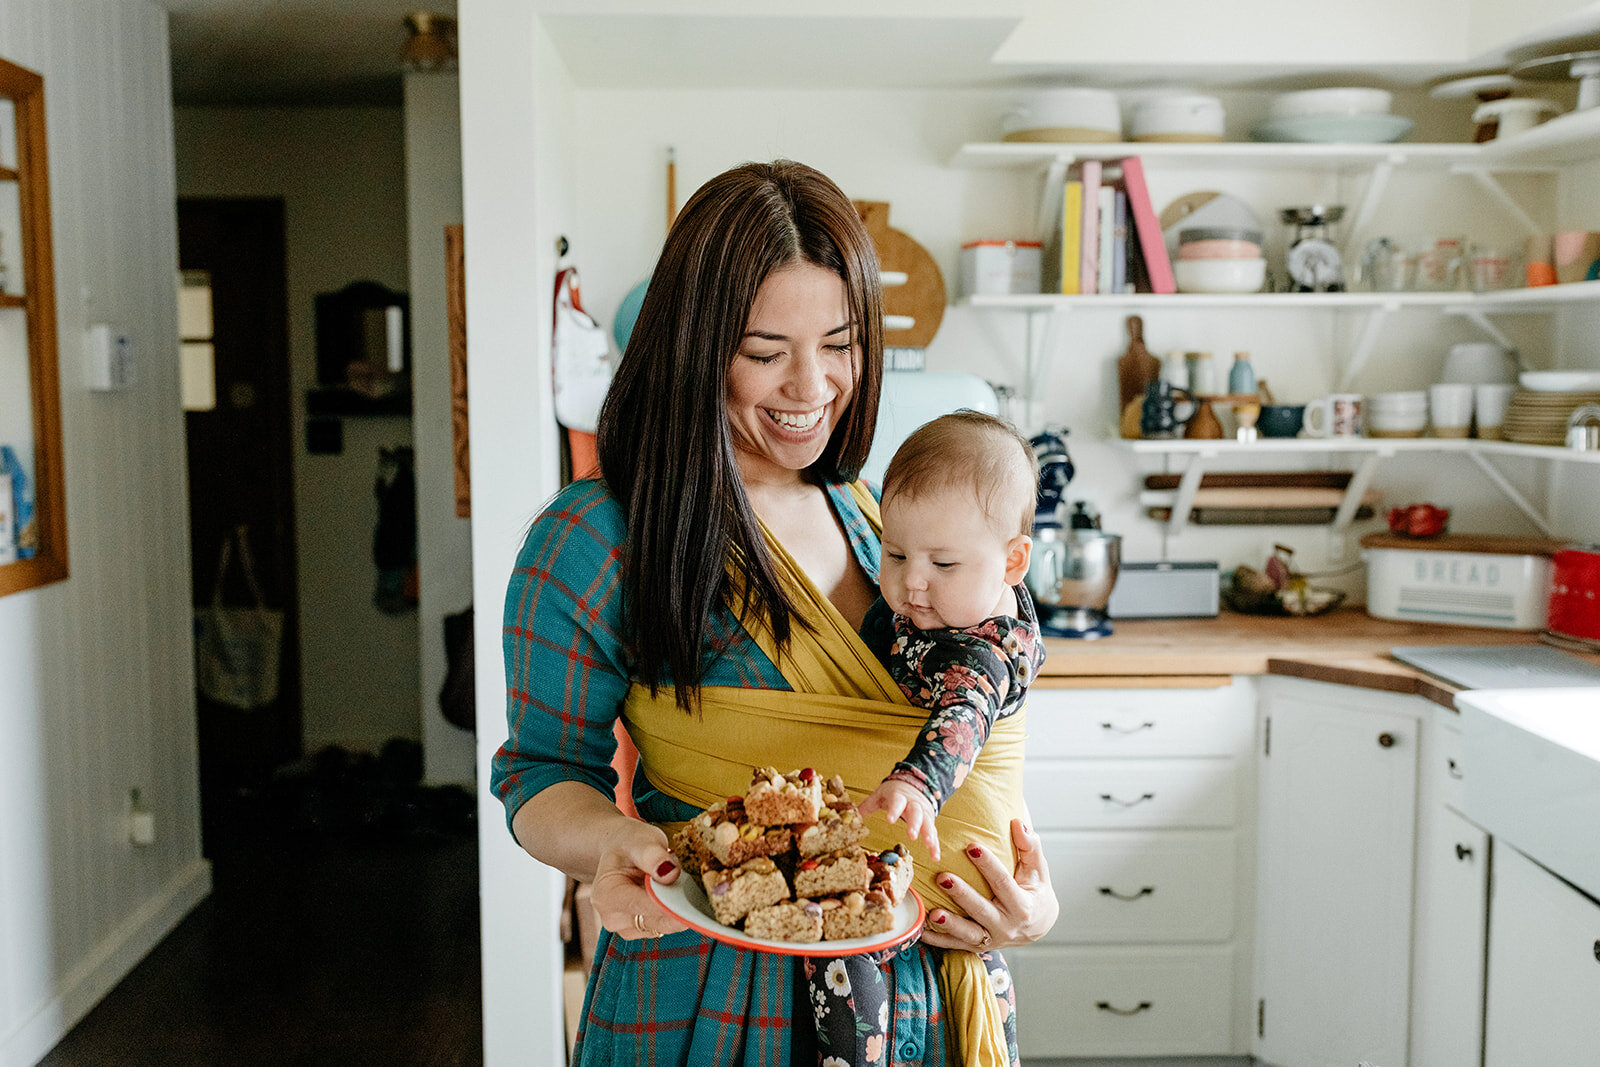
So today I’m sharing a recipe that I have made countless times with Bernie in her wrap. It’s a one-bowl, lightning fast recipe for granola bars that can be made with whatever nut or seed butters, dried fruit or nuts, chocolates, seeds, and other mix-ins that you have on hand. And they’ve got oats and flax to aid in lactation! All of the ingredients are easy to keep in your pantry for whenever you get a free moment to throw these together, and these bars keep for a while in the fridge or freezer. They’re nutty, chewy, filling, and perfectly sweet. I’ve eaten so many of these and Eggboy has too! (Think he’s started lactating? Lol) The only steps I obviously don’t do while Bernie is in her wrap are putting them in and taking them out of the oven and then chopping them into bars. But everything else is wildly easy and after making these one or two times you’ll probably memorize the ingredient amounts. And by the way, this recipe is page one of her cookbook

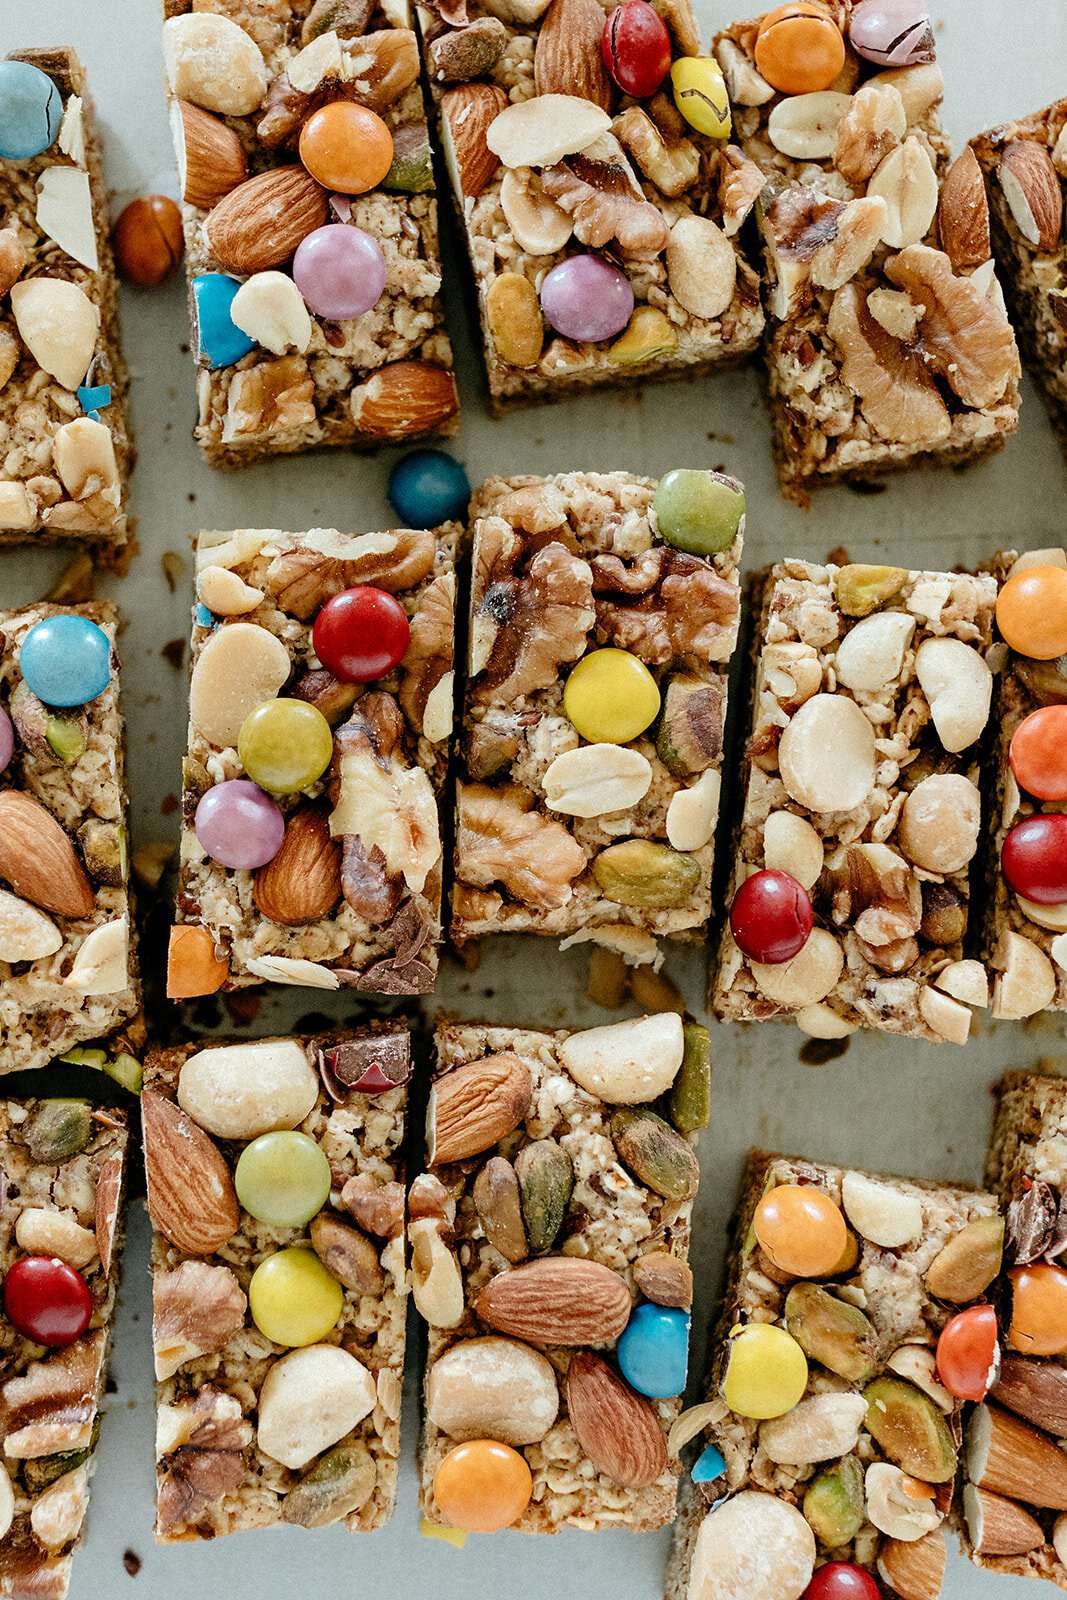
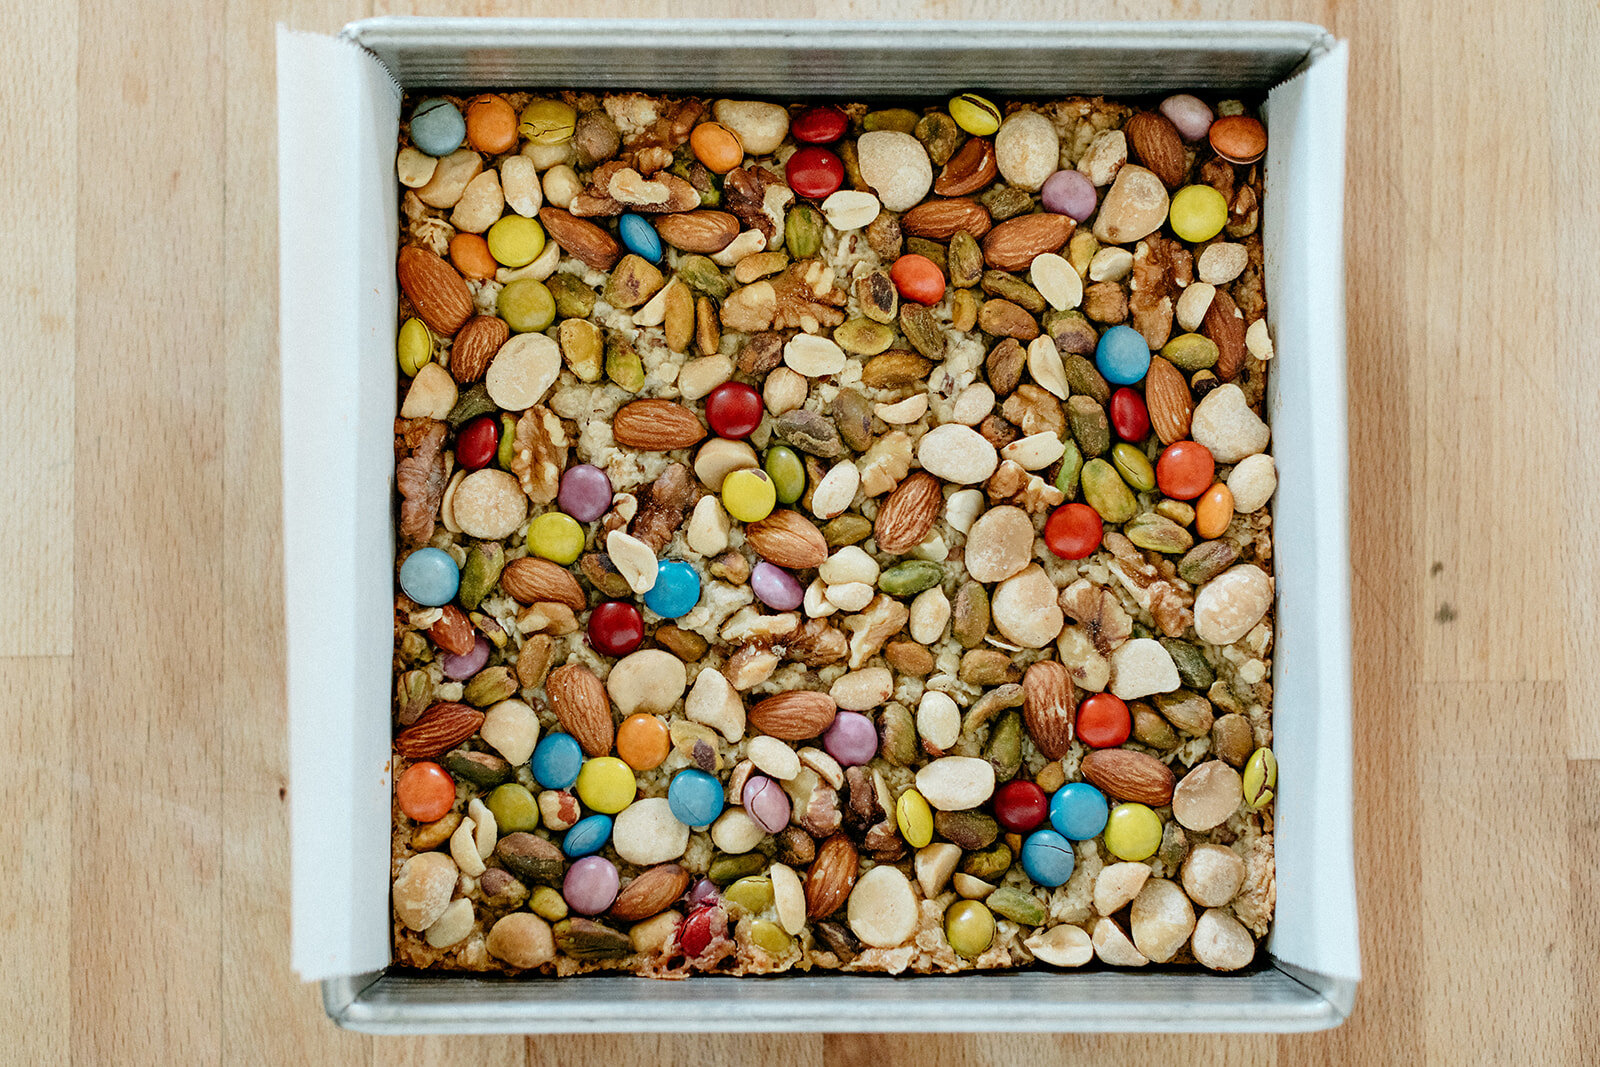
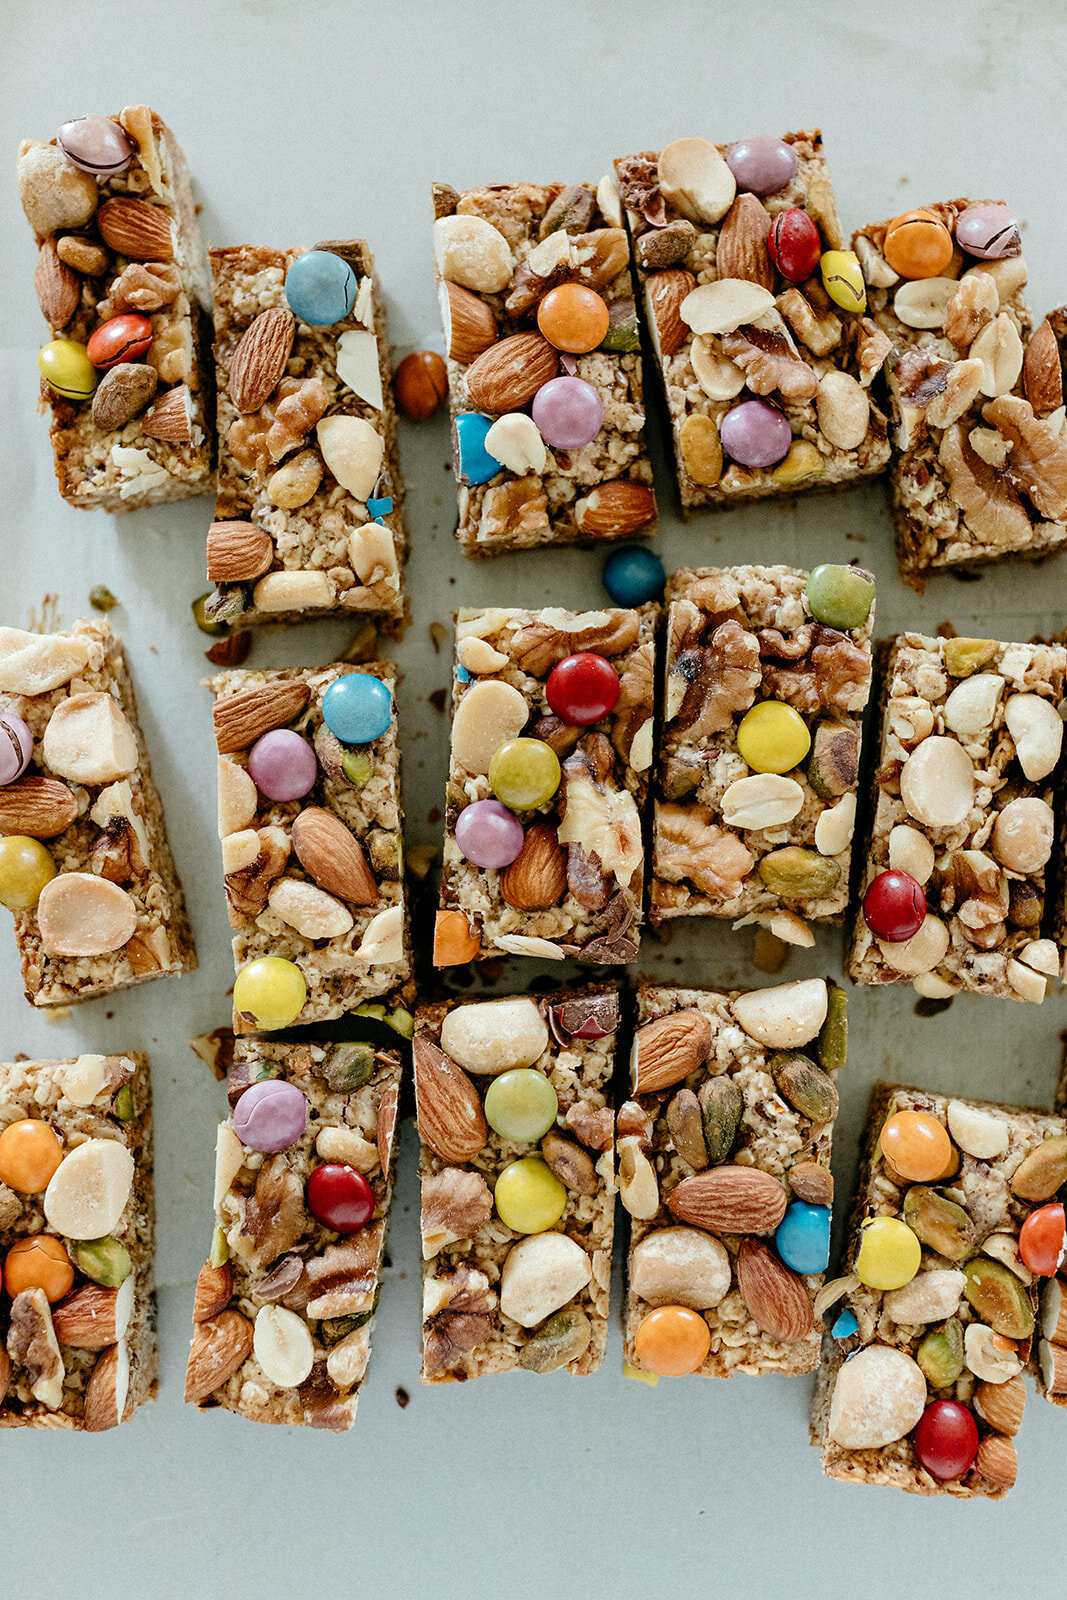
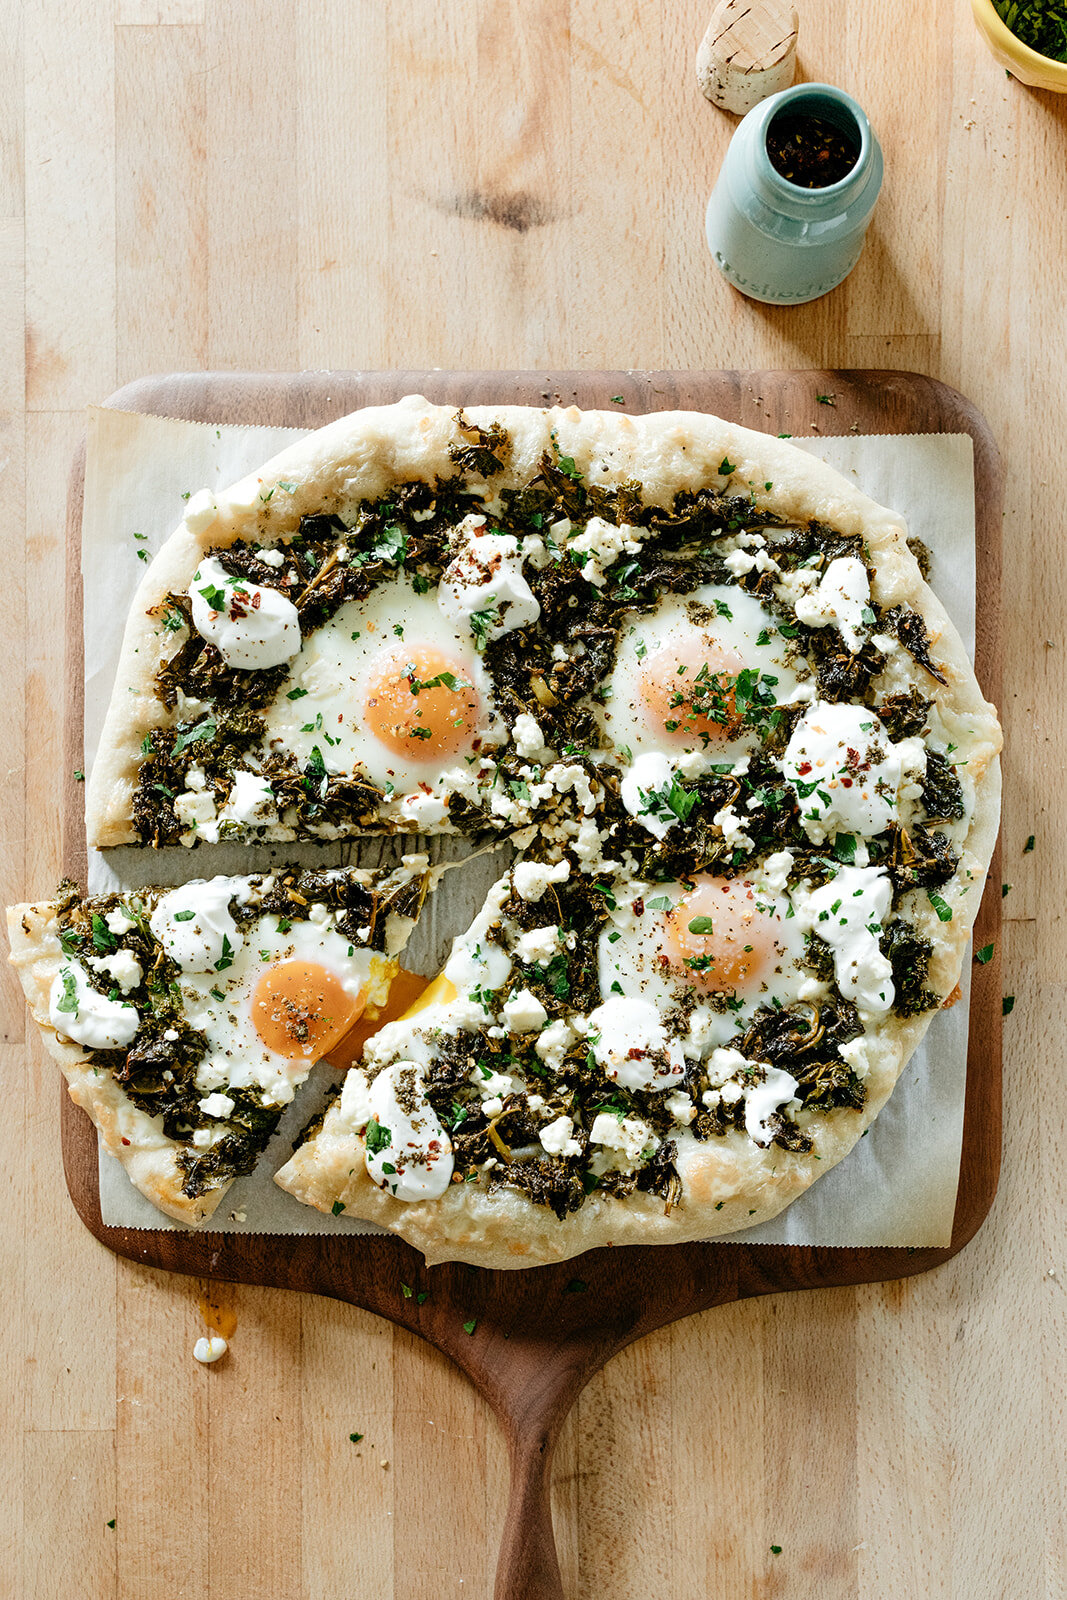
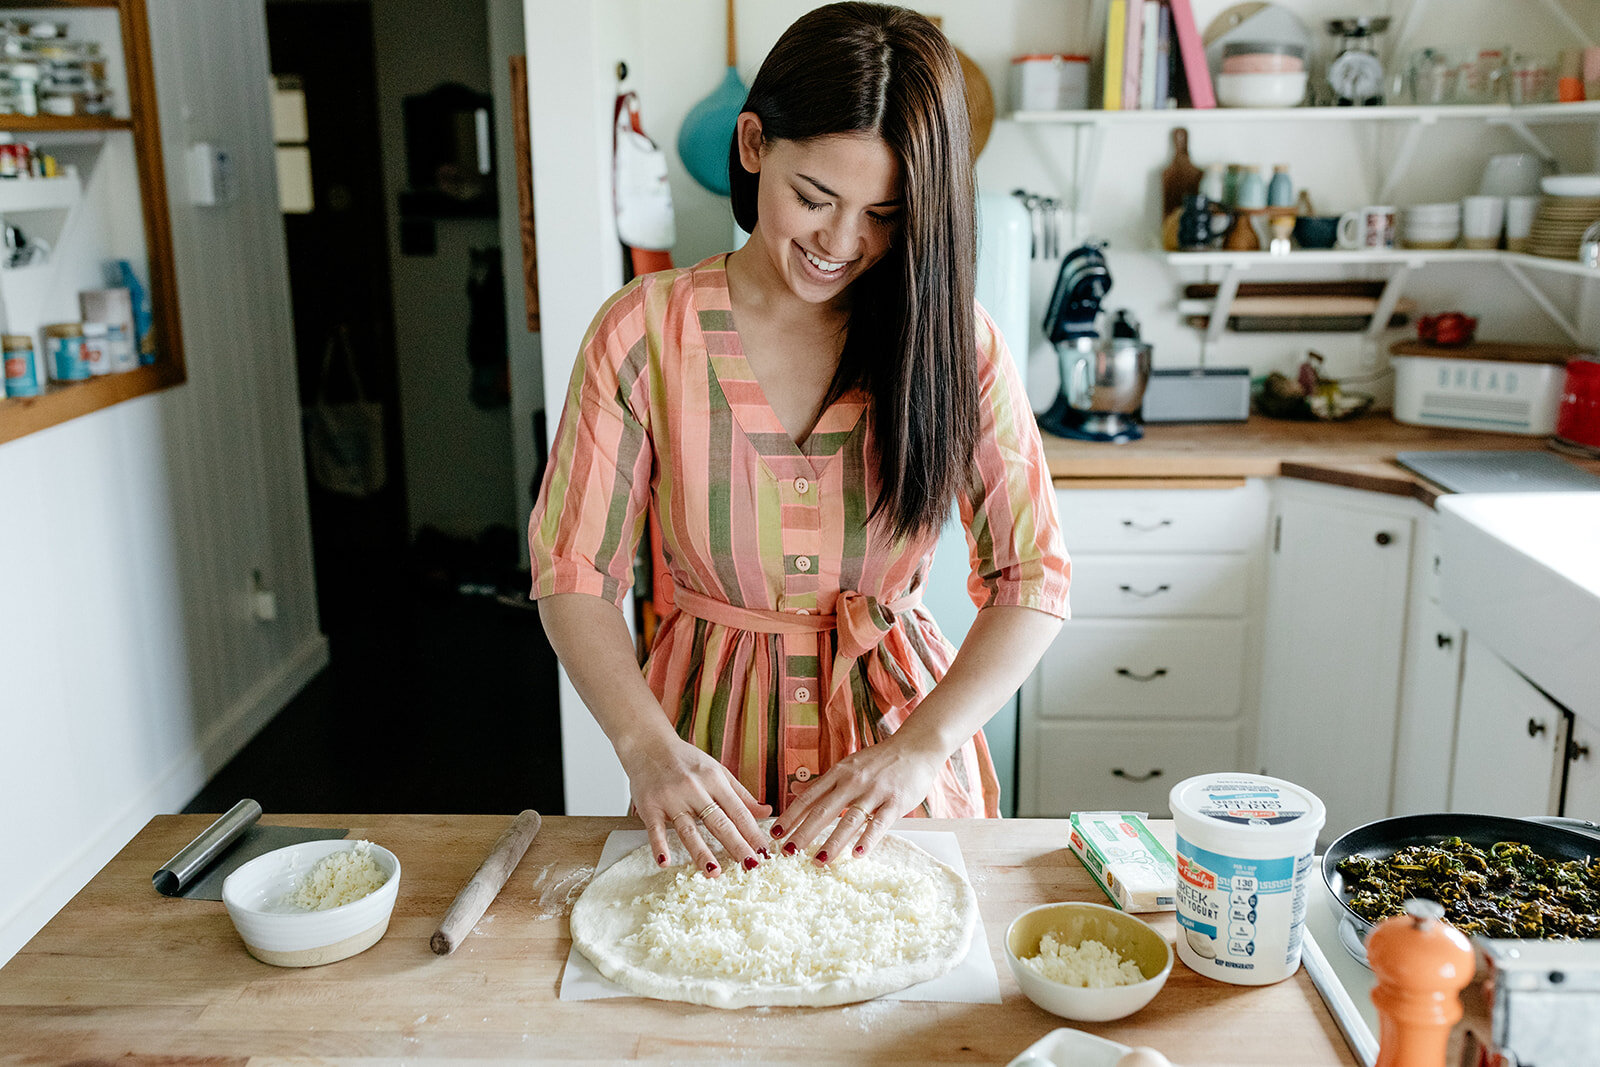
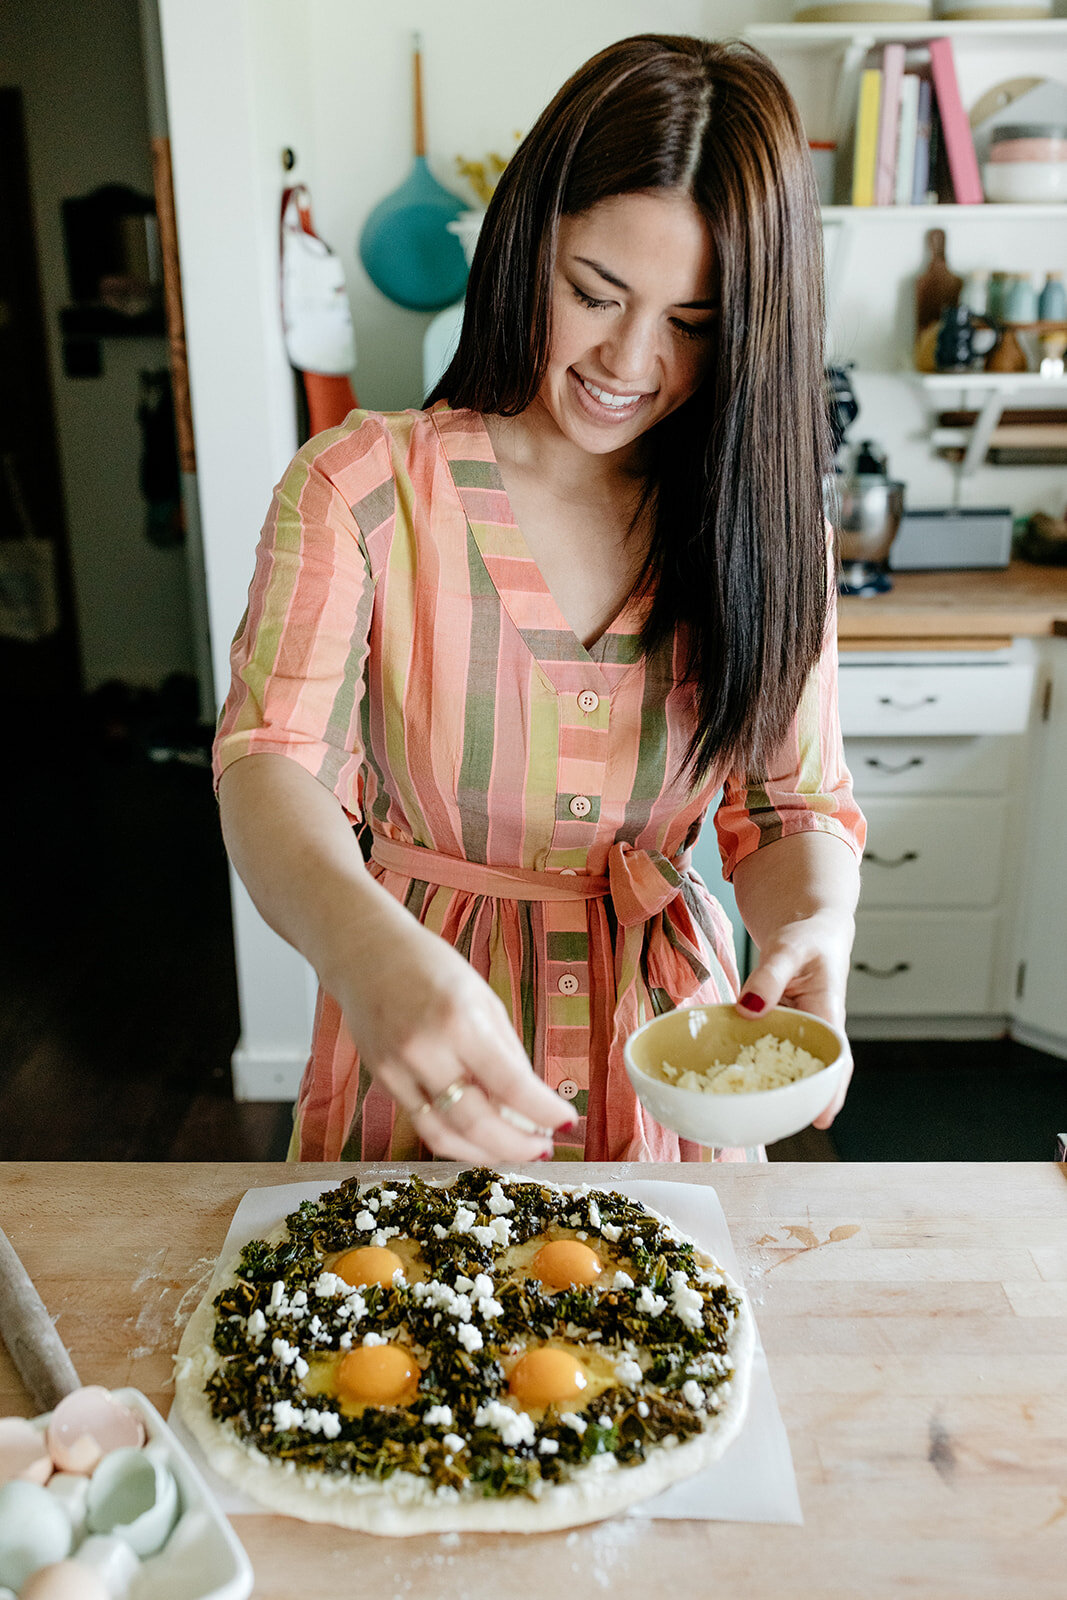
My favorite combos are: cashew butter + dried apricots, almond butter + a broken up white chocolate bar, tahini + roasted pistachios + crumbled marzipan or halva, and peanut butter + dark chocolate. For these pictures I couldn’t decide, so I added all of the nuts! And candy coated chocolates.

So for all of the new parents out there who just want to bake a darn thing, this one is for you!! 


Choose Your Own Adventure Granola Bars

makes 18

Ingredients

1 (14 oz) can sweetened condensed dairy milk or sweetened condensed coconut milk

1/2 c (128g) unsweetened nut or seed butter (I love cashew butter, almond butter, and tahini the best!)

1 tb vanilla extract

1/2 tsp kosher salt

3 1/2 c (280g) quick cooking oats

3 tb (45g) flax seeds, or a mix of different seeds (chia, millet, sunflower, etc)

1 c (112g) roasted salted nuts

3/4 c (120g) dark chocolate chips or candy coated chocolates

Dried fruits, optional

Clues

Preheat the oven to 350ºF. Line an 8” x 8” baking dish with enough parchment paper so that it comes up the sides and hangs over by 1”. 

In a large mixing bowl, stir together the condensed milk, nut or seed butter, vanilla, and salt. Add the oats, seeds, and nuts* and mix to combine.

*Alternatively, you can add the nuts in the next step by pressing them into the top of the granola bars when you add the chocolate chips. This is what’s pictured and it’s just a different lewk!

Scrape into the baking dish and spread it out evenly. Press the chocolate chips and dried fruits (if using) into the top. Bake for 25 minutes or until lightly browned around the edges. Let cool in the pan for 10 minutes then remove to a rack to cool completely. Chop into bars. Store in an airtight container at room temperature for a few days, in the refrigerator for up to a week, or in the freezer for up to a few months.


-yeh!

photos by chantell and brett quernemoen

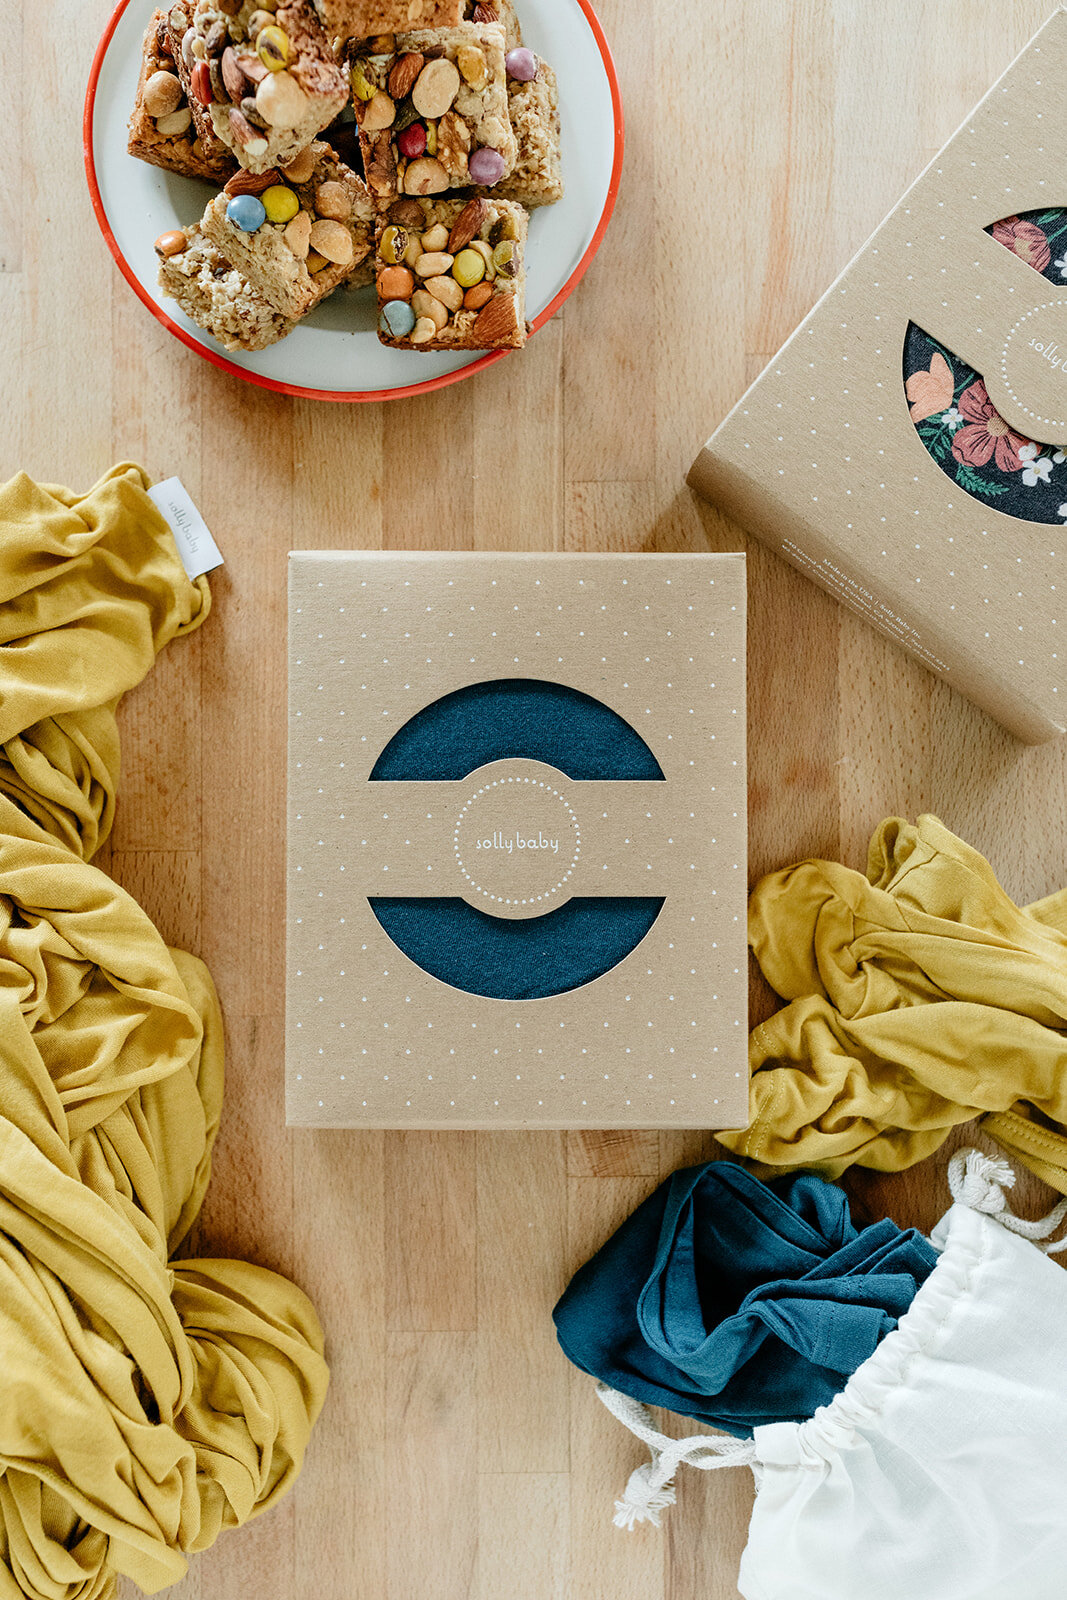
Thank you SO much to Solly Baby for sponsoring this post and also just for existing. You guys are the best and I love you. Fronds, here is a discount code for 15% off anything on the Solly site: MollySolly15 (code expires November 4th)!

green shakshuka pizza

Well this has been a weird few weeks! It’s the middle of October and I am sitting at my kitchen table, eating a Chrismukkah cookie, looking outside at a blanket of snow, and the sun is out and Eggboy is putzing around inside the house. The middle of October typically means sweaters not parkas, tiptoeing around the mud in socks with sandals, and only ever having Eggboy sightings at random times in the middle of the night since during the days he’s harvesting sugar beets. I guess the Chrismukkah cookie things remains the same though because Emily’s cookie swap is just two months away and I’ve got a title to defend. 

Beet harvest, which is supposed to start every year on October 1st, has yet to start, due to the weather, and as of yet, the fate of the beets is totally unknown. They’re in the ground still and we don’t even know if they’ll ever make it out of the ground. Each day brings so many questions. What do the fields look like after yesterday’s weather event? What will they look like after tomorrow’s weather event? When did I start referring to storms as “weather events”? What will the beet processing plant do? Should I continue stocking our freezer with baked goods for the drivers?? This whole situation is totally unprecedented and confusing.

And another thing that this weather has screwed up?? My trip to New York this past weekend :(!! I’d been looking forward to it for FOREVER and had been building my dumpling tolerance, rehearsing my hotdish demo, and also had all of these plans in place for Bernie’s first nights away from both me and Eggboy (assuming he’d be harvesting). But then on Friday there was a perfect storm of getting sick and the blizzard. And then I was glued to my couch (cuddling with Bernie, at least!!) watching the Mighty Ducks. It was a major bummer but then seeing Bernie’s face on her first sled ride cheered me way way up. 

The weather, the snow, the harvest, the flights!

Anytime life is weird like this, I try to maintain some sense of sanity by working extra hard to eat greens. My green smoothie in the morning, spinach salads at lunch, a few extra piles of kale in my quesadillas, all feel even more important because if life is gonna be weird, I at least want to try and feel not as weird physically. Yes I still stress eat the extra Chrismukkah cookie, but I strive to balance it with an extra pile of kale so that I have the energy to deal with all of the unknowns.

And pizza night is no exception! Sure, there is the salad pizza route. But now that’s snowy, Eggboy and I have been craving more of a hot situation. Enter: green shakshuka pizza. A gigantic pile of greens on a bed of chewy pizza dough and melty mozzarella with runny eggs, all brightened up by a sprinkle of salty feta and drizzley drizz of tangy yogurt. And obviously za’atar. (If you’re the kind of person who likes ranch on their pizza, try yogurt + za’atar!!!) There are so many delicious flavors and textures up in here that strike the perfect balance of healthy-ish and doughy cheesy comfort. It’s also pretty because look @ that oozy egg!!!!!

I am using Our Family yogurt and mozzarella here, two reliable staples in my fridge that I turn to regularly on pizza night. And if you’re coming to my Our Family event in Fargo on Saturday, give me a shout!!! Can’t wait to see you :)


Green Shakshuka Pizza

Makes one 12” pizza

Ingredients

2 tb olive oil

2 cloves garlic, minced

1 jalapeño pepper, seeded and finely chopped

1 tsp sweet paprika

6 oz kale, stemmed and coarsely chopped

4 oz spinach

2 tb veggie, chicken stock, or water

Kosher salt

Black pepper

Crushed red pepper

Juice of 1/2 lemon

1 lb pizza dough (storebought or homemade, I love Jim Lahey’s dough)

All-purpose flour, for dusting

6 oz Our Family mozzarella, shredded

4 large eggs

4 oz crumbled feta

Our Family plain Greek yogurt, za’atar, and chopped flat-leaf parsley, for topping

clues

Preheat the oven to 425ºf with a pizza stone if you have one. In a large skillet, heat the olive oil over medium heat. Add the garlic, jalapeño, and paprika and cook, stirring, for a minute, and then add the kale and spinach in a couple of batches, allowing it to wilt slightly in between so it doesn’t overflow the pot. Add a good pinch of salt and cook, stirring often, for 7 minutes. Stir in the stock or water and cook for 5 more minutes. Add a few turns of black pepper, a pinch of crushed red pepper (or more to taste), and the lemon juice. Taste and adjust seasoning as desired. Remove from heat and set aside to cool slightly while you roll out the pizza dough.

Roll out the dough on a lightly floured piece of parchment into a 12” round. Sprinkle with the mozzarella and then use tongs to transfer the kale mixture to the pizza (discarding any excess moisture that’s in the skillet). Create 4 wells in the kale mixture and crack in the eggs, taking care not to break the yolks. To ensure that the yolks don’t break, I like to crack the eggs into a separate little bowl first and then pour them on the pizza. That way if I break I yolk while cracking the egg, I can use that egg for something else. Sprinkle on the feta. Carefully slide onto the pizza stone (if you don’t have one, slide it on a baking sheet) and bake until the egg whites are firm but the yolks are still runny; begin checking for doneness at 10 minutes. 

Top with dollops of yogurt and sprinkles of za’atar, parsley, salt, pepper, and crushed red pepper and enjoy!


-yeh!

photos by chantell and brett quernemoen

thank you, our family, for sponsoring this post!!

Noodle Kugel with Cardamom and Apples

Hotdish : My Upper Midwest Fronds :: Kugel : Me. 

[Hotdish is to my upper Midwest fronds as kugel is to me.]

Not in the way that kugel was a dish that we ate on a regular basis for dinner growing up, but rather in the way that I just assumed that everybody grew up with it and took a nostalgic comfort in it. Like I literally thought that everyone knew kugel until last year, when Alana talked to me about her first experience about it. I was in shock that she’d never had it! It’s like a… sweet mac and cheese? It was… interesting! But in a good way! And then I met a dozen more people with the same reaction at the Fargo Hotdish Festival when Bernbaum’s brought an amazing kugel to compete with tater tot hotdishes of all sorts. It dawned on me then that not everyone knows this dish that was so central to my childhood holidays and I suddenly had to figure out a way to explain it and convince my fronds that it totally deserved to be classified as a hotdish.  

And seriously, if you bend the definition of a vegetable to mean, well, fruit then you’ve got it: the cottage cheese mixture is your sauce, the noodles are your starch, the nuts are your protein, and the raisins/cherries/apples are your produce. Hotdish. Sold. 

Flavor-wise, think of it as rice pudding made with noodles! And baked! Or, ok, a slightly sweet, a teensy bit sour, and kind of soufflé-like mac and cheese. And for all of the times I’ve made fun of Eggboy for having sweet cookie salad alongside the main course of his meal (as opposed to as dessert), I now owe him an apology because kugel, in all of its dessert-leaning glory, is part of the main course.

The kugel that my mom made growing up was based on Emeril’s recipe. It was such a great combination of richness and milkiness and it had the perfect touch of cinnamon and sugar, as well as a toasty nutty topping. It was, and continues to be, the only place that I will eat cottage cheese. For some reason it’d been a really really long time since we had it at holidays and it wasn’t until the Fargo Hotdish Festival that I was reminded of it because Bernbaum’s kugel was so similar. It brought me right back to kugel of my youth, but it had the one inspiring addition of granny smith apples. I LOVED this addition because it added color, crunch, and brightness to an otherwise super heavy dish. So I stole the idea. I added it to my family kugel, along with some cardamom and a bit of lemon for additional depth of flavor, and I fine tuned the sweetness to create the new and improved family kugel that Bernie is going to grow up with. 

And it’s of course only fitting that I’m using Our Family goodies to make Our Family Kugel! They make it easy to make this recipe since their cottage cheese and sour cream comes in big enough tubs that you end up using just a whole big tub of each. 

Make this for Rosh Hashanah or it’s also great prepped in advance, so make it for Yom Kippur break fast.

L’Shana Tovah, everyone! 


Noodle Kugel with Cardamom and Apples

Serves 8

ingredients

Kosher salt

1 lb Our Family wide egg noodles

6 tb (85g) unsalted butter, divided

5 large eggs

1 lb Our Family cottage cheese

1 lb Our Family sour cream

3/4 c (150g) sugar

1 c (236 mL) whole or 2% milk

2 tsp cinnamon, divided

1/2 tsp cardamom

1 tb vanilla extract

Zest and juice of 1 lemon

2 granny smith apples, chopped

2 c (260g) pecans, chopped

1/2 c (100g) light brown sugar

clues

Preheat oven to 350ºf. Grease a 9” x 13” casserole dish or similar (pictured is a deep 9” x 9” casserole) and set aside.

Bring a large pot of salted water to a boil and cook the egg noodles to al dente, about 4-5 minutes. Drain and toss with 4 tablespoons of butter.

In a large bowl, combine the eggs, cottage cheese, sour cream, sugar, milk, 1 teaspoon of cinnamon, cardamom, vanilla, lemon zest, and 1 1/2 teaspoons salt. In a small bowl, toss the apples with the lemon juice. Fold the noodles and apples into the cottage cheese mixture and then transfer to the casserole dish. 

In a small bowl, melt the remaining 2 tablespoons of butter and add the pecans, brown sugar, remaining teaspoon of cinnamon, and a good pinch of salt. Sprinkle it all over the top of the noodles. Bake until set, about 1 hour. Let cool slightly and serve.

To prep it the day before, do everything up until the step where you top it with the nuts. Cover and refrigerate. When ready to bake, top it with the nuts and bake as directed, but tack on another few minutes to the baking time. 


-yeh!

photos by chantell and brett quernemoen

this recipe was created in partnership with our family!

Sesame Pretzels with Za’atar Mozzarella Sauce

We’ve done it, we’ve achieved peak coziness: Bernie and I live in our matching fuzzy fleeces, soothing whispery folk tunes play on repeat, and in between nap times we pick squash and apples from the garden. I never thought I could love the fall more, but of course now it’s one thousand million times better with a giggling Bern strapped on to me. I try not to think about the fact that in a few short years, this time of year will mean that it’s time for her to start school, but what I do love thinking about is all of the school supplies and the after school snacks that we’re going to enjoy. (I know, I’ve just made my first batch of baby food and I’m already thinking about after school snacks?! Listen, I already know her full Bat Mitzvah menu, ok? Just let me have this.) I’m just so excited because the snack time that I engaged in regularly after school growing up was probably my favorite meal of the day. I mean, I loved my little breakfast sandwiches that I would eat on the ride to school, and lunches in my frog lunchbox were always great especially when they involved baloney sandwiches, but nothing ever compared to sitting at the kitchen counter, feasting on snacks with a big glass of milk, and hanging out with my mom while D.W. got sassy at Arthur on the TV in the background. After school snack food was always the best food: dumplings, pizza pockets, miniature bagel dogs, cheese on toast, and the crown jewel, hot pretzels. I’d have the frozen kind that came with a packet of extra coarse salt and I’d microwave them with a slice of cheese that got bubbly around the edges. I was never patient enough to allow them to cool so that they wouldn’t burn my mouth, but they were delicious all the same (and nothing that a sip of cold milk wouldn’t fix). It was the best tastiest little break between school and marimba practice and I can’t wait to have that break with Bern.

So today I’ve got a new and improved version of my old fave, one that I’ll make as soon as Bernie starts school, and one that I make these days just to have around for noshing. It uses a kitchen hack that I love which is that you can make pretzels from pretty much any fluffy bread dough, store-bought or homemade. In a world where I am an octopus and can hold Bernie with one set of arms while kneading dough with the other set of arms, I would use challah with this. Challah pretzels forever. But these days I’ve been using store-bought bread dough which works like a charm. In a nod to Jerusalem bagels, these are oval shaped and covered in enough sesame seeds to make any basic dough a little bit more interesting. You can make a big batch of pretzels and keep them in the freezer and reheat them so that they’re hot and ready at a moments notice. And they get dipped in a creamy, rich, and surprisingly easy to make cheese sauce that’s topped with earthy za’atar and includes protein thanks to the real milk and cheese within. It’s soo good and filled with nutrients that will keep Bernie going through her after school orchestra rehearsal/dance class/hockey practice/horticulture club (?) etc. It’s just a simple milk-based sauce that comes together in a snap and then melts with mozzarella. I love mild mozzarella with a pop of za’atar but, yes, you can use any melty cheese that’s in your fridge!


Sesame Pretzels with Za’atar Mozzarella Sauce

Makes 8 pretzels 

Pretzel Ingredients

1 c (230g) baking soda

2 (11 oz) cans store bought french bread dough (or a batch of homemade yeasted bread dough, might I suggest challah dough!)

2 c (472g) water

Egg wash: 1 large egg beaten with a splash of water

Sesame seeds and flaky salt, for topping

Mozzarella Sauce Ingredients

2 tb unsalted butter

2 tb all-purpose flour

1 c (240g) whole milk

1 c (125g) shredded mozzarella

Kosher salt and black pepper, to taste

Crushed red pepper or hot sauce, optional

2 tsp za’atar

Clues

First, bake the baking soda. Preheat the oven to 250ºf, spread the baking soda out in an 8” x 8” baking dish and bake for 1 hour. Let it cool and set it aside. This can be prepped ahead and stored in an airtight container for several weeks. (Even though the baked baking soda isn't as strong as lye, which is traditionally used for making pretzels, it could still potentially irritate your skin, so avoid touching it with bare hands once it's out of the oven.)

To form the pretzels, line two baking sheets with parchment paper and preheat the oven to 350ºf. Divide the dough into 8 pieces and then roll into snakes, about 3/4-1” thick. Smoosh the ends together to form big ovals and transfer to the baking sheets, one inch apart. 

(If using homemade dough, complete the recipe through the first rising, shape into ovals as described above, place on baking sheets lined with parchment paper, and then give them their second rise.)

Make the baking soda bath: Add the water to the dish with the baking soda and whisk gently to dissolve the baking soda (it likely won’t all dissolve, a few baking soda chunks are totally ok as long as you remove any that stick to the dough). Using gloved hands, tongs, or a slotted spoon, and working in batches, immerse the pretzels into the mixture for 2-3 minutes on each side. Transfer to a plate or pan lined with a paper towel and pat them dry and then place them back on the baking sheet. Brush with the egg wash, sprinkle liberally with sesame seeds and a few pinches of flaky salt, and bake until deep golden brown; begin checking at 16 minutes. Let cool slightly and then enjoy warm with cheese sauce! 

These freeze well! Let them cool fully and store in an airtight container in the freezer for up to a few months. Reheat in the microwave or thaw at room temp.

For the za’atar mozzarella sauce: In a saucepan, melt the butter over medium heat. Whisk in the flour and cook for another minute. Add half of the milk and whisk until thickened and then add the other half, continuing to whisk until thickened. Add the mozzarella and whisk until melted. Season to taste with salt, pepper, and spicy stuff, if using. Transfer to a serving bowl, top with za’atar and serve. 

Leftovers can be stored in an airtight container in the fridge and then reheated in a saucepan or microwave. Stir in an extra splash of milk, if desired, to thin it out. 


-yeh!

I’m so pleased to have partnered with milk life, on this recipe! Dairy milk always played a starring role in my favorite back to school moments! Bernie and I already obviously have a special bond when it comes to food (we just started introducing solids and she loves watching me cook!) – and I know as she gets older and goes to school, the role that food plays in how we connect together will only continue to grow.

photos by chantell and brett quernemoen.